Secrets management is an essential aspect of modern application development. It is vital to ensure that sensitive information such as database credentials, certificates, API keys, passwords and tokens are securely stored and accessible. Kubernetes offers a built-in solution for managing secrets, but integrating it with external secrets stores like AWS Secrets Manager provides enhanced security, flexibility and scalability. Users can easily rotate their credentials for security enhancement, and this will be replicated to the downstream applications that reside in the Kubernetes cluster.
In this tutorial, I will walk you through the process of managing secrets in your Kubernetes cluster using External Secrets Operator (ESO) and AWS Secrets Manager.
What Is External Secrets Operator (ESO)?
External Secrets Operator enables developers to simplify secret management by synchronizing secrets from external secret stores such as AWS Secret Manager, Microsoft Azure Key Vault and HashiCorp Vault to Kubernetes. By using ESO, you can define a Kubernetes custom resource (CRD), whereby you can specify the location from which to fetch the secrets (the external secret store), which secrets to fetch and how to synchronize them with Kubernetes Secrets.
Why Use External Secrets Operator?
- Centralized management: External Secrets Operator provides centralized storage for managing secrets across multiple environments, which reduces the complexity of managing secrets across large-scale and multiple applications. For example, when secrets are stored in AWS Secrets Manager, it is much easier to configure them to rotate within a specific period.
- Automatic synchronization: External Secrets Operator automatically synchronizes from external secrets sources, ensuring the application always has the latest secrets without any manual intervention.
- Compliance and auditing: External Secrets Operator uses external secrets stores, simplifying compliance with GDPR and the Payment Card Industry Data Security Standard (PCI DSS) by using AWS Secrets Manager’s built-in secret rotation, detailed auditing logs and access control features.
Get Started
Follow this guide, and ensure you have the following in place:
- A Kubernetes cluster up and running (EKS, for example).
- The
kubectlbinary installed and configured on your workstation. This will be used to apply the Kubernetes manifest. - An AWS account with the AWS command-line interface (CLI) configured.
- Necessary permission to create resources in AWS Secrets Manager and Kubernetes.
- Helm, a package manager for Kubernetes that simplifies the process of deploying, managing and scaling Kubernetes applications, must be installed.
Step 1: Install External Secrets Operator (ESO)
a. Add the ESO Helm repository.
helm repo add external-secrets https://charts.external-secrets.io
helm repo update
b. Install ESO: This will create an external secrets operator in the external-secrets namespace.
helm install external-secrets external-secrets/external-secrets -n external-secrets --create-namespace
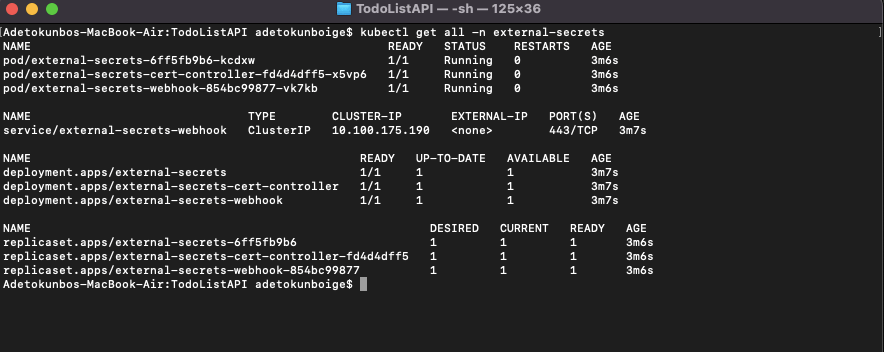
c. Verify the installation by running the command below.
kubectl get all -n external-secrets
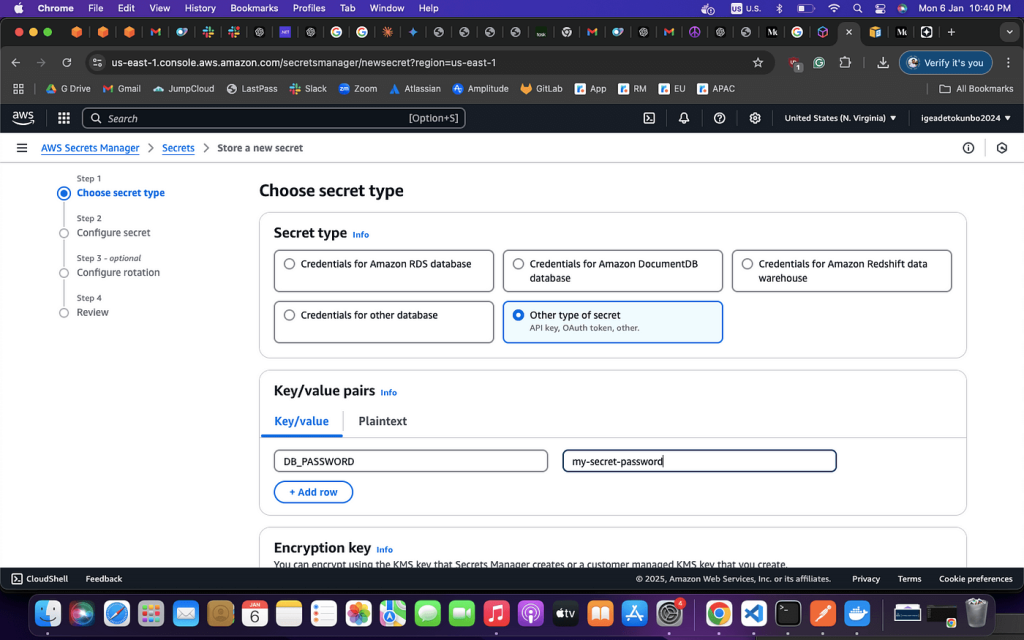
Step 2: Create a Secret in AWS Secrets Manager
- Log in to AWS.
- Open AWS Secrets Manager in the AWS Management Console.
- Create a new secret, such as
Key: DB_PASSWORDandValue: my-secret-password. - Take note of the secret Amazon Resource Name (ARN) once you are done.

Step 3: Create a SecretStore for ESO
A SecretStore is a Kubernetes custom resource definition (CRD) introduced by the External Secrets Operator. It defines the configuration details that will be used for accessing the external secret in services such as AWS Secrets Manager. In essence, SecretStore contains details of where and how ESO can access the secrets.
Before creating the SecretStore, you will need to grant the SecretStore access to your newly created secret in AWS Secrets Manager. You will be creating the following resources as a prerequisite before creating the SecretStore.
a. Create an IAM Policy: The identity and access management (IAM) policy will allow access to your newly created secrets in AWS Secrets Manager. Replace the ARN below with the ARN of the freshly created secrets in AWS Secrets Manager.
{
"Version": "2012-10-17",
"Statement": [
{
"Effect": "Allow",
"Action": [
"secretsmanager:GetSecretValue"
],
"Resource": "arn:aws:secretsmanager:region:account-id:secret:your-secret-id"
}
]
}
b. Create an IAM Role: Create an IAM role and attach the IAM policy created in the above example. Specify the trust relationship for the role to allow the EKS cluster to assume it.
{
"Version": "2012-10-17",
"Statement": [
{
"Effect": "Allow",
"Principal": {
"Service": "eks.amazonaws.com"
},
"Action": "sts:AssumeRole"
}
]
}
c. Associate the IAM role to a service account in Kubernetes: You can associate your IAM role to a Kubernetes service account using the eks.amazonaws.com/role-arn annotation to securely grant fine-grained AWS permission to your running workload in your EKS cluster without keeping long-term credentials in your application.
apiVersion: v1
kind: ServiceAccount
metadata:
name: external-secrets-sa
namespace: external-secrets
annotations:
eks.amazonaws.com/role-arn: arn:aws:iam::123456789012:role/ExternalSecretsRole
Copy the code above in a file with the filename sa-secretstore.yaml and replace eks.amazonaws.com/role-arn with the value of your IAM role ARN. Then apply the manifest by running this command:
kubectl apply -f sa-secretstore.yaml -n external-secrets
d. Create the SecretStore to use the service account: Copy and paste the Kubernetes manifest below into the file with the file name secretstore-eso.yaml and apply the manifest.
apiVersion: external-secrets.io/v1beta1
kind: SecretStore
metadata:
name: aws-secret-store
namespace: external-secrets
spec:
provider:
aws:
service: SecretsManager
region: us-east-1
auth:
jwt:
serviceAccountRef:
name: external-secrets-sa
Use this command to apply the Kubernetes manifest:
kubectl apply -f secretstore-eso.yaml
Step 4: Create an ExternalSecret Resource
Define an ESO to fetch and sync the AWS secret into your Kubernetes cluster. Copy and paste the Kubernetes manifest below into the file with the file name eso.yaml and apply the manifest.
apiVersion: external-secrets.io/v1beta1
kind: ExternalSecret
metadata:
name: my-app-secrets
namespace: external-secrets
spec:
refreshInterval: 1h # Set the refresh interval for secrets
secretStoreRef:
name: aws-secret-store
kind: SecretStore # Referencing the SecretStore created earlier
target:
name: my-app-secrets
creationPolicy: Owner # This ensures the Secret is owned by the ExternalSecret
data:
- secretKey: DB_PASSWORD # This is the key in the Kubernetes Secret
remoteRef:
key: arn:aws:secretsmanager:us-east-1:abc:secret:eso/example/secrets-Eq5llj #Replace this with the ARN of your AWS Secrets Manager
Use this command to apply the Kubernetes manifest:
kubectl apply -f eso.yaml
Conclusion
Managing secrets securely is an incredibly important aspect of running applications in Kubernetes. Using the External Secret Operator with AWS Secrets Manager, you can centralize your secret management, rotate secrets conveniently without downtime, enable automatic synchronization and improve security by reducing secret exposure risks. Furthermore, using ESO ensures that applications will always have access to the latest secrets without any manual intervention.
To further enhance your setup, consider implementing:
- Secret rotation: Enable automatic rotation of secrets in AWS Secrets Manager.
- Monitoring and auditing: Use AWS CloudTrail and Kubernetes logging to track secret access and updates.
With this setup, you have a scalable and secure solution for handling secrets in Kubernetes, making secret management easier and more reliable.
Looking to master database management in Kubernetes? Unlock Andela’s 8-step guide on how to run databases efficiently in a Kubernetes environment to drive innovation in your workflows.
The post Securing Kubernetes With External Secrets Operator on AWS appeared first on The New Stack.