Photo by Yomex Owo on Unsplash
Introduction
In Kubernetes, managing highly available applications is critical for maintaining service reliability and resiliency. A scalable and resilient architecture keeps your applications and services running without disruptions, which keeps your customers and users happy! Thankfully, there are several configuration options to meet these important NFRs for your k8s workloads.
Control Plane
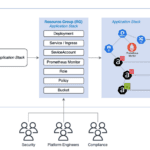
Amazon Elastic Kubernetes Service (EKS) is a managed Kubernetes service that makes it easy to run Kubernetes on AWS without installing, operating, and maintaining your own Kubernetes control plane or worker nodes. The EKS architecture is designed to eliminate any single points of failure that may compromise the availability and durability of the Kubernetes control plane and offers an SLA of 99.95% for API server endpoint availability.
Last December at re:Invent 2024, AWS announced a new mode for managing Amazon EKS clusters: Amazon EKS Auto Mode promises simplified cluster operations, improved application performance, availability, and security, and continuously optimizes compute costs. With EKS Auto Mode, you can focus on running your applications without worrying about the underlying infrastructure and resilience of the control plane.

AWS EKS Auto mode
It is designed to be highly available, fault-tolerant, and scalable. Following the recommendations of the Well-Architected Framework, Amazon EKS runs the Kubernetes control plane across multiple AWS Availability Zones (AZ) to ensure high availability. The cluster control plane auto-scales based on the load and any unhealthy control plane instances are replaced automatically. The availability of EC2 instances attached to an EKS Cluster is covered under the Amazon Compute SLA.
In a nutshell, as far as the resilience of the control plane is concerned, AWS EKS auto mode handles all of that for you allowing engineering teams to focus on building applications and business logic rather than managing the infra!
Data Plane
Multi-Region Kubernetes Clusters
If you are one of those with stringent availability requirements you may choose to operate across multiple AWS Regions. This approach protects against larger-scale disasters or regional outages. However, the cost and complexity of implementing such a setup can be significantly higher. This architecture pattern is typically reserved for disaster recovery and business continuity. Therefore understanding the Spectrum of Resilience Strategies is very important:
We can categorize resilience strategies based on their:
- Recovery Time Objective (RTO): How quickly do you need to restore service?
- Recovery Point Objective (RPO): How much data loss you can tolerate?
- Cost: The expense of implementing and maintaining the strategy.
- Complexity: The difficulty of setup and ongoing management.
Here’s a breakdown of the strategies, moving from “cold” to “hot” standby:
1. Backup and Restore (Very Cold Passive):
- Description: Regularly backing up data and infrastructure configurations to a separate region or storage location. If a disaster occurs, you restore the backups to a new environment.
- RTO: Very high (hours to days).
- RPO: High (potential for significant data loss, depending on backup frequency).
- Cost: Lowest (storage costs for backups, minimal infrastructure costs).
- Complexity: Low (relatively simple backup and restore procedures).
- Use Cases: Suitable for non-critical workloads with relaxed RTO/RPO requirements, where cost is the primary concern.
-
Shades:
– Frequency of backup. Daily, Hourly, etc. - Location of backup. S3, Glacier, another region.
- Automation of restore. Manual vs Fully automated.
2. Pilot Light (Active/Passive — Cold Standby):
- Description: Maintaining a minimal “pilot light” environment in a secondary region, including core infrastructure components. When a disaster occurs, you scale up the pilot light to full capacity.
- RTO: Moderate (minutes to hours).
- RPO: Low (data replication is typically used, minimizing data loss).
- Cost: Low to moderate (cost of the pilot light environment, data replication).
- Complexity: Moderate (setup and testing of failover procedures).
- Use Cases: Suitable for workloads that require faster recovery than backup and restore, but can tolerate some downtime.
-
Shades:
– Amount of infrastructure kept running. Minimal core services, or almost a full duplicate. - Automation of scaling. Manual, semi, or fully automated.
- Data replication type. Async, or sync.
3. Warm Standby (Active/Passive — Warm Standby):
- Description: Maintaining a fully scaled-down, but functional, environment in a secondary region. Data is continuously replicated. When a disaster occurs, you switch traffic to the warm standby.
- RTO: Low (minutes).
- RPO: Very low (near-zero data loss).
- Cost: Moderate to high (cost of the warm standby environment, data replication).
- Complexity: High (complex failover and failback procedures).
- Use Cases: Suitable for critical workloads that require minimal downtime.
- Shades:
- Amount of traffic the warm standby receives. No traffic, or a small amount of test traffic.
- Testing of failover. Frequent, or infrequent.
- Data replication consistency. Strong or eventual consistency.
4. Active/Active (Hot Standby):
- Description: Running identical environments in multiple regions simultaneously, with traffic distributed across them. If one region fails, traffic is automatically routed to the remaining regions.
- RTO: Very low (seconds).
- RPO: Very low (near-zero data loss).
- Cost: Highest (cost of running full environments in multiple regions).
- Complexity: Highest (complex traffic management, data synchronization, and application design).
- Use Cases: Suitable for mission-critical workloads that require continuous availability and cannot tolerate any downtime.
- Shades:
- Traffic distribution. Weighted, or even distribution.
- Data replication. Synchronous, or asynchronous.
- Application design. Region-aware applications, or not.
Expanding on the Cost-Benefit Trade-Off:
- Cost of Downtime: The “cost of being down” is not just financial. It includes reputational damage, customer churn, and lost productivity.
- Workload Characteristics: The nature of your workload influences the appropriate strategy. Real-time applications require lower RTO/RPO than batch processing.
- Compliance Requirements: Regulatory requirements may dictate specific RTO/RPO targets.
- Testing and Validation: Regularly testing failover procedures is crucial to ensure they work as expected.
- Geographic Distribution: Active/active can also improve performance by serving users from the closest region.
By carefully evaluating these pillars, you can choose the resilience strategy that best balances cost, complexity, and risk for your specific needs for your Multi-regional deployments.
Multi-cluster
This is a popular pattern where we deploy workloads across multiple Amazon EKS clusters to eliminate a Kubernetes cluster from being a single point of failure. Multi-cluster architecture also provides opportunities for testing, maintenance, and upgrades without disrupting production environments. By diverting traffic or workloads to a set of clusters during planned maintenance activities, one can ensure continuous service availability and achieve near-zero downtime.
It does mean we use Application Load Balancer (ALB) or Network Load Balancer (NLB) to distribute traffic to replicas of services running inside a cluster or even load balance traffic across multiple clusters. When using ALB, we can create dedicated target groups for each cluster. Using weighted target groups, we can then control the percentage of traffic each cluster gets. For workloads that use an NLB, we can use AWS Global Accelerator to distribute traffic across multiple clusters.
Note: Avoid potential pitfalls with configuration drifts across clusters. When adopting a multi-cluster architecture for resiliency, it is essential to reduce the operational overhead of managing clusters individually. The idea is to treat clusters as a unit. Should an issue arise in the deployment, it’s easier to fix if all clusters share the same workload version and configuration.
Compute Resources (Nodes/Node Groups)
Kubernetes Cluster AutoScaler (CA)
The Kubernetes Cluster Autoscaler is a popular Cluster Autoscaling solution maintained by SIG Autoscaling. It is responsible for ensuring that your cluster has enough nodes to schedule your pods without wasting resources. It watches for pods that fail to schedule and for underutilized nodes. It then simulates the addition or removal of nodes before applying the change to your cluster. The AWS Cloud Provider implementation within CA controls the .DesiredReplicas field of your EC2 Auto Scaling Groups.
- Automated Node Scaling: The CA automatically adjusts the number of nodes in your cluster based on the resource requests of pending pods. If pods are waiting to be scheduled and there aren’t enough resources, the CA will provision new nodes. Conversely, if nodes are underutilized, the CA can scale down the cluster, removing unnecessary nodes.
- Improved Resource Utilization: By dynamically scaling the number of nodes, the CA helps to optimize resource utilization. You avoid over-provisioning nodes, which can lead to wasted resources and increased costs. The cluster more closely matches the resource demands.
- Cost Optimization: Scaling down the number of nodes when they are not needed can significantly reduce your cloud computing costs. You only pay for the resources you use.
- Simplified Cluster Management: The CA automates the process of adding and removing nodes, reducing the manual effort required to manage your Kubernetes infrastructure. This frees up your operations team for other tasks.
- Increased Application Availability: By ensuring that there are enough resources available to run your applications, the CA can help to improve application availability and prevent resource starvation. Pods are more likely to be scheduled quickly.
- Support for Diverse Environments: The CA is designed to work with various cloud providers (AWS, Azure, GCP) and even on-premises Kubernetes clusters. This makes it a versatile solution for managing Kubernetes in different environments.
- Integration with Kubernetes: The CA is a core Kubernetes component and integrates seamlessly with other Kubernetes features, such as the scheduler and the HPA.
- Configuration Flexibility: The CA offers a range of configuration options, allowing you to customize its behavior to meet your specific needs. You can control the minimum and maximum number of nodes, the types of instances to use, and other parameters.
- Node Draining: When scaling down, the CA gracefully drains nodes by evicting pods before terminating the instance. This prevents application disruptions and ensures a smooth scaling process.
-
Scaling Faster: There are a couple of things you can do to make sure your data plane scales faster and recovers quickly from failures in individual Nodes and make CA more effecient:
— Over-provision capacity at the Node level
— Reduce Node startup time by using Bottlerocket or vanillaAmazon EKS optimized Linux
Karpenter
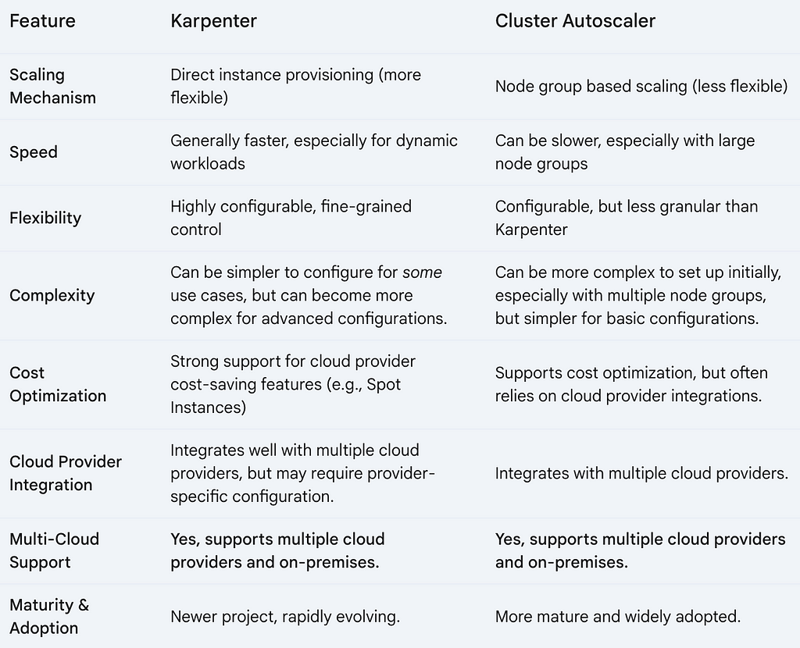
Karpenter was introduced in this space as an AWS alternative to the CA which allowed for greater flexibility with fine-grained control over cluster and node management like never before for EKS.
- Faster and More Efficient scaling by directly provisions EC2 instances based on the needs of pending pods and thus eliminates the overhead of managing node groups and significantly speeds up the scaling process, especially for workloads with fluctuating demands.
- Fine-grained Control control over the types of instances it provisions. You can specify instance types, availability zones, architectures (e.g., ARM64), and other instance properties through “provisioners.” This allows you to optimize resource utilization and cost efficiency for different workloads. You can tailor the compute resources to the workload. Karpenter can efficiently provision worker nodes for a wide variety of workloads, including those with specialized hardware requirements (like GPUs) or architectural needs.
- Simplified Cluster Management by dynamically provisioning nodes. You don’t need to pre-configure and manage multiple node groups with varying instance types. This reduces operational overhead and makes it easier to manage your EKS cluster. Less configuration and management are required.
- Improved Cost Optimization: Karpenter integrates well with AWS cost-saving features. It can automatically provision nodes using Spot Instances, Savings Plans, or other cost-effective options, helping you minimize your EKS spending.
- Better Integration with EKS: As an AWS-developed tool, Karpenter seamlessly integrates with EKS and other AWS services. This leads to a smoother experience and allows Karpenter to leverage AWS-specific features and best practices.
- Right-Sized Instances: Karpenter provisions instances that precisely match the resource requests of pending pods. This avoids over-provisioning and improves resource utilization. You don’t get instances that are too large or too small.
- Automated Node Draining: When scaling down, Karpenter gracefully drains nodes by evicting pods before terminating the instance. This prevents application disruptions and ensures a smooth scaling process.
- Declarative Configuration: Karpenter uses declarative configuration through provisioners, making it easy to manage and version your worker node configurations. With Karpenter, you can define NodePools with constraints on node provisioning like taints, labels, requirements (instance types, zones, etc.), and limits on total provisioned resources. When deploying workloads, you can specify various scheduling constraints in the pod specifications like resource requests/limits, node selectors, node/pod affinities, tolerations, and topology spread constraints. Karpenter will then provision right-sized nodes based on these specifications.
Here is a Quick high-level comparison:
EKS Auto Mode
As discussed under the control plane section above, EKS Auto Mode extends into the data plane with its powerful features that simplify worker node management by leveraging Karpenter under the hood. So in essence what you get is Managed Karpenter where AWS manages the Karpenter installation and configuration for you. EKS Auto Mode provides a superior experience compared to manually configuring the Cluster Autoscaler.
For the vast majority of EKS users, especially those starting new clusters or looking for a simplified solution, EKS Auto Mode is the recommended approach for autoscaling worker nodes.
Let’s break down some examples of situations where EKS Auto Mode might not be sufficient and you might need more direct control via Karpenter or (less commonly) the Cluster Autoscaler:
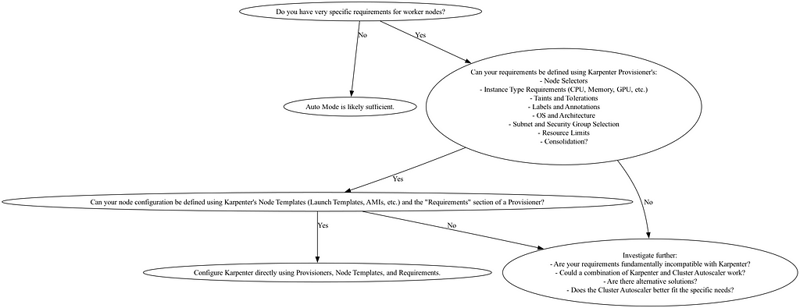
A decision tree for EKS Auto Mode
1. Fine-Grained Instance Type Control:
- Specific Instance Families: Auto Mode lets you choose instance types, but you might need a very specific generation (e.g., c5.xlarge vs. c7g.xlarge for Graviton) or a particular instance family due to workload requirements (e.g., memory-optimized instances). Auto Mode’s selection might not always align perfectly with your needs and complex computing use cases.
- Heterogeneous Instance Types within a Provisioner: While Karpenter can provision nodes with different instance types, Auto Mode simplifies this and may not offer the same level of granular control. You might want a mix of instances within a single provisioner based on cost or performance needs.
- Custom AMIs: You might require a custom Amazon Machine Image (AMI) with specific software pre-installed or security hardening applied. Auto Mode typically uses standard AMIs, so you’d need more control for custom AMIs.
2. Taints and Tolerations:
- Node Taints: Taints are used to repel pods from specific nodes. You might need to taint nodes for specialized workloads (e.g., GPU nodes) and then use tolerations in your pod specifications to allow those pods to run on the tainted nodes. Auto Mode might not offer the fine-grained control to apply specific taints during node provisioning.
- Complex Tolerations: While Auto Mode does consider tolerations in pod specs if you have a complex set of tolerations, sometimes direct Karpenter configuration is better to ensure the right nodes are provisioned.
3. Node Labels:
- Application-Specific Labels: Labels are used to organize and select nodes. You might need to apply specific labels to nodes for application-specific purposes (e.g., environment, team, or application name). Auto Mode’s labeling might not be flexible enough for all cases.
- Node Pool Management: If you want to create and manage distinct sets of nodes (node pools) with different labels and configurations, you might need more direct control than Auto Mode provides.
4. Advanced Karpenter Features:
- Provisioner Prioritization: If you want to prioritize certain provisioners (sets of instance types and configurations) over others, you would need to configure Karpenter directly.
- Custom Scheduling Logic: For very specialized scheduling needs beyond what Kubernetes natively provides, you might need to use advanced Karpenter features.
- Integration with other tools: If you have existing infrastructure-as-code (IaC) or configuration management tools that directly manage Karpenter, switching to Auto Mode could require significant changes.
5. Node Lifecycle Management:
- Node Draining Customization: While Auto Mode handles node draining, you might have specific requirements for how nodes are drained (e.g., specific pod eviction policies or pre-shutdown scripts).
- Node Replacement Strategies: You might need to define custom node replacement strategies based on your application’s requirements.
In summary , Auto Mode is excellent for most common scenarios. However, if your worker node requirements involve very specific instance types, complex taints, and tolerations, application-specific labels, advanced Karpenter features, or customized node lifecycle management, then configuring Karpenter directly gives you the necessary fine-grained control. You’ll know you need it when the Auto Mode configuration options simply don’t offer the knobs you need to turn.
Note: It’s important to keep in mind that EKS Auto Mode is still under active development, and AWS is continuously adding new features and improvements. So, it’s always a good idea to check the latest AWS documentation to see if Auto Mode meets your specific needs.
Deployment Strategies
In Kubernetes, several options for deploying applications are available, each suited for different needs and scenarios. Some of the popular techniques include blue-green deployments, canary deployments, and rolling updates. Each method is unique in what it has to offer for managing updates and minimizing downtime.
- Rolling Updates
Kubernetes Rolling Updates are a critical feature for deploying and updating applications with zero downtime. They work by gradually replacing old pods with new ones, ensuring a smooth transition and minimizing disruption to users.
Choosing the Right Values is critical. The optimal values for maxSurge and maxUnavailable depend on your application’s specific requirements and resource constraints. Here are some factors to consider:
- Application Sensitivity: If your application is critical and cannot tolerate any downtime or performance degradation, you should use conservative values for maxSurge and maxUnavailable (e.g., 10-20%).
- Resource Availability: If your cluster has limited resources, you should use lower values for maxSurge to avoid resource exhaustion.
- Update Speed: If you need to deploy updates quickly, you can use higher values for maxSurge and maxUnavailable to speed up the process.
When you’re first setting up rolling updates, it’s best to start with conservative values for maxSurge and maxUnavailable and gradually increase them as you gain confidence, monitor the application, and fine-tune it as per your needs.
2. Canary Deployments
A Canary deployment strategy is a gradual rollout where you deploy a small percentage of the new version (the “canary”) alongside the existing version of your service. It is typically used when deploying new features or updates to a subset of users or servers to test them in a live environment and is often used for applications that require frequent updates. This strategy allows for the testing of new features with minimal impact on the production environment and can help us identify issues before they affect the entire system. A service mesh provides advanced traffic management features, including fine-grained traffic splitting, header-based routing, and more. This is highly recommended for more sophisticated canary deployments. For instance, Istio offers a VirtualService that defines how traffic is routed to your services where you you may choose to route most traffic (e.g., 90%) to v1 of your service and a small percentage (e.g., 10%) to v2 (the canary). If there were no service mesh involved you have to back this with an ingress controller strategy or a load balancer to do the same. For instance, Ambassador a popular ingress controller for Kubernetes offers canary releases based on weights.
3. Blue-Green Deployments
With the Blue-Green deployment strategy, you have two complete environments (blue and green). One environment (e.g., blue) is live, serving all traffic. You deploy the new version to the other environment (green). After testing in green, you switch all traffic from blue to green. Blue/green is about faster deployments and simplified rollbacks. The new release candidate is tested before being switched to the production environment, allowing for a smooth transition without any downtime or errors. This approach also heavily depends on your load balancer or ingress control and the ability to switch traffic from blue to green or vice-versa in the event of a rollback.
In summary, choosing a deployment strategy depends on the specific requirements and characteristics of the application or service being deployed. Canary deployments are great for services that go with frequent updates and testing, Rolling deployments are a great choice for zero-downtime deployments, and Blue-Green deployments are ideal for minimizing downtime during deployments.
Topology Spread Constraints (TSC)
Kubernetes Topology Spread Constraints (TSC) ensure pods are spread across zones during scale-up. However, they don’t guarantee balanced distribution during scale-down. The Kubernetes descheduler can be used to address this imbalance.
apiVersion: apps/v1
kind: Deployment # Or StatefulSet, etc.
spec:
  template:
    spec:
      topologySpreadConstraints:
        - maxSkew:  # Maximum difference in pods across topologies
          topologyKey:  # The topology domain (e.g., zone, node)
          whenUnsatisfied:  # How to handle if constraints can't be met
          labelSelector: # Selects the pods to which this applies
            matchLabels:
              :
          # Optional: minDomains:  # Minimum number of domains to spread across
Let’s break down the key parameters:
- maxSkew: This is the most crucial parameter. It defines the maximum difference in the number of pods between any two topologies (e.g., zones). A maxSkew of 1 means that the difference in pod count between any two zones should be no more than 1.
- topologyKey: This specifies the topology domain. Common values:
- kubernetes.io/hostname: Spreads pods across nodes.
- topology.kubernetes.io/zone: Spreads pods across availability zones.
- topology.kubernetes.io/region: Spreads pods across regions. (Less common)
- Custom labels: You can use any label as a topology key, giving you very flexible control.
- whenUnsatisfied: This dictates what Kubernetes should do if the constraint cannot be satisfied when a pod is scheduled:
- DoNotSchedule: (Recommended in most cases) Prevents the pod from being scheduled if the constraint cannot be met. This ensures the spread is maintained.
- ScheduleAnyway: Allows the pod to be scheduled even if the constraint is violated. This is generally not recommended as it defeats the purpose of the constraint.
- labelSelector: This uses standard Kubernetes label selectors to specify which pods the constraint applies to. This is essential to target the constraint.
- minDomains (Optional): Specifies the minimum number of topology domains (like zones) that pods should be spread across. This is useful for high availability, ensuring your application runs in a minimum number of zones.
This ensures that no two zones have more than one pod difference for pods labeled app: my-app
topologySpreadConstraints:
  - maxSkew: 1
    topologyKey: topology.kubernetes.io/zone
    whenUnsatisfied: DoNotSchedule
    labelSelector:
      matchLabels:
        app: my-app
Likewise, you could spread by nodes to limit the difference in the number of app: my-app pods on any two nodes to a maximum of 2.
topologySpreadConstraints:
  - maxSkew: 2
    topologyKey: kubernetes.io/hostname
    whenUnsatisfied: DoNotSchedule
    labelSelector:
      matchLabels:
        app: my-app
Important Considerations:
- DoNotSchedule is Crucial: In almost all cases, you should use whenUnsatisfied: DoNotSchedule. Otherwise, the constraint becomes meaningless.
- Label Selectors are Essential: Without alabelSelector, the constraint will apply to all pods, which is rarely what you want.
- maxSkew and Replica Count: maxSkew interacts with the number of replicas. If you have fewer replicas than topology domains, perfect spreading might not be possible.
- Planning: Think about your failure domains (zones, nodes) and how you want your application to behave in the event of a failure. This will help you determine the appropriate maxSkew and topologyKey.
Descheduler
The Descheduler is a valuable tool for managing and optimizing Kubernetes clusters. By evicting the appropriate pods, the Descheduler can help improve resource utilization, maintain the desired state of the cluster, and enhance the scalability and security of the cluster in the face of node failures and vulnerabilities. Becomes very useful to maintain the balance and spread across your zones specifically during scale-down events.
Topology Aware Routing on Amazon EKS
Topology Aware Routing (Also referred to as Topology Aware Hints or TAH before v1.27) provides a mechanism to help keep network traffic within the zone where it originated. Preferring same-zone traffic between Pods in your cluster can help with reliability, performance (network latency and throughput), or cost.
Kubernetes clusters are increasingly deployed in multi-zone environments. Topology Aware Routing provides a mechanism to help keep traffic within the zone it originated from. When calculating the endpoints for a Service, the EndpointSlice controller considers the topology (region and zone) of each endpoint and populates the hints field to allocate it to a zone. Cluster components such as kube-proxy can then consume those hints, and use them to influence how the traffic is routed (favoring topologically closer endpoints).
You can enable Topology Aware Routing for a Service by setting the service.kubernetes.io/topology-mode annotation to Auto. When there are enough endpoints available in each zone, Topology Hints will be populated on EndpointSlices to allocate individual endpoints to specific zones, resulting in traffic being routed closer to where it originated from.
When using Horizontal Pod Autoscaler, topology spread constraints ensure newly created pods are spread among AZs during scaling out. However, when scaling in, the deployment controller won’t consider AZ balance, and instead randomly terminates pods. This may cause the endpoints in each AZ to be disproportionate and disable Topology Aware Routing. The descheduler tool can help you re-balance pods by evicting improperly placed pods so that the Kubernetes scheduler can reschedule them with the appropriate constraints in effect.
Topology Aware Routing and Node Affinity
While node affinity is not required for basic topology-aware routing, it becomes very useful in the following scenarios:
- More Control Over Pod Placement: Node affinity gives you fine-grained control over where pods are initially scheduled. While basic topology-aware routing ensures traffic is preferentially routed to the same zone, it doesn’t guarantee that pods will be evenly distributed across zones. Node affinity allows you to express preferences or requirements for pod placement.
- Taints and Tolerations: If you use taints to restrict pods to specific nodes (e.g., GPU nodes), you’ll need tolerations in your pods to allow them to run on those nodes. Node affinity can then be used to further refine placement within those tainted nodes.
Let’s consider the following scenario : Regional Redundancy with Specialized Hardware for your ML Training job:
- Regional Redundancy: Your application must be resilient to zone failures. You want pods to be spread across at least three availability zones in a region.
- Specialized Hardware: Your training jobs require GPUs. You have a set of nodes in each zone equipped with GPUs.
- Data Locality (Performance): For performance reasons, you want training jobs to run on GPU nodes in the same zone where the training data resides (assuming data locality is a factor in your application’s architecture).
In this scenario, basic Topology Aware Routing is not sufficient as you also need to combine this with special node types such as matching node labels as shown below:
apiVersion: apps/v1
kind: Deployment
metadata:
  name: ml-training-app
spec:
  replicas: 9 # 3 replicas per zone (adjust as needed)
  selector:
    matchLabels:
      app: ml-training
  template:
    metadata:
      labels:
        app: ml-training
    spec:
      affinity:
        nodeAffinity: # Ensure pods are on GPU nodes
          requiredDuringSchedulingIgnoredDuringExecution: # Must be on a GPU node
            nodeSelectorTerms:
            - matchExpressions:
              - key: gpu # Label on your GPU nodes (e.g., nvidia.com/gpu)
                operator: Exists
          preferredDuringSchedulingIgnoredDuringExecution: # Preference for same zone
          - weight: 100
            preference:
              matchExpressions:
              - key: topology.kubernetes.io/zone
                operator: In
                values:
                  - $(ZONE) # Placeholder for zone label
      topologySpreadConstraints: # Ensure spread across zones
      - maxSkew: 1
        topologyKey: topology.kubernetes.io/zone
        whenUnsatisfied: DoNotSchedule
        labelSelector:
          matchLabels:
            app: ml-training
      containers:
      # ... (your container definition)
      env:
      # ... (environment variable injection for ZONE as before)
      initContainers:
      # ... (init container for ZONE injection as before)
Pod Disruption Budget (PDB)
A pod disruption budget (PDB) is a Kubernetes policy that helps ensure the high availability of your applications running on the platform. It defines the minimum number of pods from a specific deployment that must be available at any given time. This ensures that even during maintenance operations or unforeseen disruptions, your application remains functional with minimal downtime.
Here’s a breakdown of how PDBs work:
- Minimum Available Pods: You define the minimum number of pods that your application needs to function properly. This minimum acceptable number is specified in the PDB configuration.
- Voluntary Disruptions: PDBs primarily target voluntary disruptions, which are planned events initiated by the cluster administrator or automated processes. These disruptions could include:
- Node Drain : Taking a node out of service for maintenance requires draining the pods running on it. A PDB can prevent evictions from exceeding a safe limit to ensure application functionality.
- Rolling Updates : Upgrading deployments often involve rolling restarts where new pods are introduced while old ones are terminated. A PDB can pace this rollout to avoid overwhelming the system.
- Not for Involuntary Disruptions: PDBs don’t have control over involuntary disruptions caused by hardware failures, network issues, or software crashes. These events can still cause your application to become unavailable.
Benefits of using Pod Disruption Budgets:
- High Availability: PDBs minimize downtime during planned maintenance or upgrades by preventing accidental pod evictions beyond a safe threshold.
- Operational Efficiency: They provide a safety net for cluster administrators, allowing them to perform maintenance tasks with confidence.
- Resource Optimization: PDBs can help prevent unnecessary pod evictions, leading to more efficient resource utilization within the cluster.
Here are some additional points to remember:
- PDB Definition: PDBs are defined as YAML or JSON objects and applied using the kubectl apply command.
- Disruption Budget: The budget can be specified as an absolute number of pods or a percentage of the total replicas in the deployment.
- Always Allow Unhealthy Pod Eviction: It’s recommended to set the alwaysAllowUnhealthyPodEviction policy to true in your PDB. This allows evicting misbehaving pods during a node drain to proceed without waiting for them to become healthy.
- Testing & Simulation: Test PDB configurations thoroughly to ensure they align with your application’s availability requirements and architecture. Simulate disruptions and verify that the desired number of Pods remains available.
- Monitor and Alert: Implement monitoring and alerting mechanisms to detect PDB violations. This enables proactive management and ensures timely intervention in case of availability issues.
- Graceful Shutdowns: Configure your applications to handle graceful shutdowns when evicted by a PDB. This allows them to complete ongoing tasks, release resources, and avoid data loss or corruption.
By implementing pod disruption budgets, you can enhance the resilience and availability of your applications running on Kubernetes clusters.
Example Pod Disruption Budget (PDB) in Kubernetes:
apiVersion: policy/v1
kind: PodDisruptionBudget
metadata:
  name: hello-world
spec:
  selector:
    matchLabels:
      app: hello-world
  minAvailable: 30%
Pod Disruption Budgets (PDBs) work alongside deployment strategies like rolling updates with maxSurge and maxUnavailable settings to manage application availability during upgrades.
Pod Disruption Budget (PDB) and Rolling Update Strategy
You don’t necessarily need both a pod disruption budget (PDB) and a rolling update strategy, but they can work together effectively to achieve different goals for application availability in Kubernetes. They can be complementary for robust application availability during both maintenance and upgrades:
- PDB sets a safety floor: It defines the minimum number of pods that must be available even during a rolling update with maxUnavailable.
- Rolling update controls the rollout: It manages the pace of pod replacement within the boundaries set by the PDB’s minimum availability.
- While maxSurge and maxUnavailable define the deployment’s rollout strategy, a PDB sets a hard minimum on the number of available pods. This minimum should ideally be greater than or equal to maxUnavailable to avoid conflicts.
-
Scenario: Let’s say your deployment has 5 replicas, maxSurge is set to 1 (allowing 1 extra pod), and maxUnavailable is set to 2 (allowing 2 pods to be unavailable).
- Without PDB: The deployment could potentially terminate 2 pods and create 1 new one, leaving only 2 pods available (5 total – 2 unavailable + 1 surge). This might violate application requirements for minimum availability.
- With PDB: If a PDB is defined with a minimum of 3 available pods, the deployment can only terminate pods down to 3 running pods (5 total – 3 minimum available). This ensures your application remains functional with at least 3 pods even during the update.
- In case of a conflict between maxUnavailable and the PDB’s minimum available pods, the stricter setting takes precedence. This ensures the PDB’s minimum availability requirement is met.
- Setting the PDB’s minimum available pods to a value greater than or equal to maxUnavailable in your deployment strategy ensures the PDB doesn’t accidentally restrict the deployment’s ability to perform rolling updates within the defined boundaries.
- Using percentages for both PDB’s minimum available and deployment’s maxUnavailable allows for flexibility as you scale your application.
Pod Priority and Preemption
Kubernetes supports prioritizing your pods when it comes to scheduling. A critical workload/job could be marked as a higher priority pod compared to some other non-critical pods or jobs thereby increasing the chances of getting scheduling ahead of some other lower priority pods.
apiVersion: scheduling.k8s.io/v1
kind: PriorityClass
metadata:
  name: high-priority
value: 10000
globalDefault: false # Not the default priority class
description: "This priority class is for high-priority pods."

apiVersion: v1
kind: Pod
metadata:
  name: my-high-priority-app
spec:
  priorityClassName: high-priority # Assign the priority class
  containers:
  - name: my-container
    image: my-image
    # ... other pod specifications
- Important Factors
- R esource quotas can interact with pod priorities. A higher-priority pod might still be subject to resource quotas.
- PodDisruptionBudgets can protect even low-priority pods from being preempted if they are part of a critical application.
Quality of Service (QoS)
QoS classes define how Kubernetes handles resource requests and limits for pods. They influence how Kubernetes schedules pods and how it handles resource contention. Kubernetes automatically assigns a QoS class to a pod based on its resource requests and limits.
QoS Classes:
- Guaranteed: Pods that have both resource requests and limits specified for all containers, and the requests are equal to the limits. These pods are given the highest priority for resources. They are less likely to be evicted.
- Burstable: Pods that have resource requests and limits specified, but the requests are less than the limits. They can “burst” up to their limits if resources are available. They are more likely to be evicted than Guaranteed pods.
- BestEffort: Pods that do not have resource requests or limits specified. They are given the lowest priority for resources and are the most likely to be evicted.
Qos and Pod Priority
While Scheduling Kubernetes first considers pod priority when scheduling pods. Higher-priority pods are scheduled first. Within a priority level, Kubernetes uses QoS classes to determine how to allocate resources. Guaranteed pods are given preference. When resources are scarce, Kubernetes uses both pod priority and QoS to decide which pods to evict. Lower-priority pods are evicted first. Within a priority level, BestEffort pods are evicted before Burstable pods, and Burstable pods are evicted before Guaranteed pods.
As a starting point, make sure to set appropriate resource requests and limits for your pods. This is crucial for QoS and for ensuring that your applications have the resources they need. Use the Guaranteed QoS class for critical system pods or applications that require predictable performance. Burstable is often a good balance for most applications, allowing them to burst up to their limits when resources are available. However, only use BestEffort for non-critical pods or background tasks that can tolerate resource scarcity and potential eviction.
Pod Affinity and Node Affinity
Pod affinity and node affinity are Kubernetes features that allow you to control how pods are scheduled onto nodes. They are essential tools for building resilient applications on EKS (or any Kubernetes cluster).
Pod affinity allows you to specify rules about where a pod should be scheduled based on other pods that are already running in the cluster. You can use it to attract pods to the same node or zone as other pods (co-location) or to repel pods from the same node or zone (anti-affinity).
Co-location (Attraction):
- Placing related pods (e.g., a web server and its database) on the same node to reduce latency.
- Ensuring that pods that communicate frequently are located close to each other.
Anti-affinity (Repulsion):
- Spreading replicas of a pod across different nodes (or zones) to increase availability and fault tolerance. If one node fails, the other replicas will continue to run.
- Preventing pods that consume a lot of resources from being scheduled on the same node and avoiding the bad-neighbor effect.
Types of Pod Affinity:
- requiredDuringSchedulingIgnoredDuringExecution: The rule must be satisfied during scheduling. If the rule cannot be met, the pod will not be scheduled. IgnoredDuringExecution means that if the affinity rule becomes violated after the pod is scheduled (e.g., the other pod is terminated), the pod will continue to run but will not be rescheduled if it is evicted.
- preferredDuringSchedulingIgnoredDuringExecution: The rule is preferred but not required. Kubernetes will try to satisfy the rule, but if it cannot, the pod will still be scheduled (potentially on a different node). IgnoredDuringExecution has the same meaning as above.
- requiredDuringSchedulingRequiredDuringExecution: The rule must be satisfied during scheduling and must continue to be satisfied during execution. If the rule becomes violated after the pod is scheduled, the pod will be evicted. This is the strongest form of affinity.
- preferredDuringSchedulingRequiredDuringExecution: The rule is preferred during scheduling and must be satisfied during execution. If the rule is violated after the pod is scheduled, the pod will be evicted.
apiVersion: v1
kind: Pod
metadata:
  name: my-pod
spec:
  affinity:
    podAntiAffinity:
      requiredDuringSchedulingIgnoredDuringExecution:
        topologyKey: kubernetes.io/hostname # Spread across nodes
        labelSelector:
          matchExpressions:
          - key: app
            operator: In
            values:
            - my-app
  # ... other pod specifications
Node Affinity
Node affinity allows you to specify rules about which nodes a pod should be scheduled on based on labels that are attached to the nodes. For instance scheduling pods on nodes with specific hardware (e.g., GPUs).
Types of Node Affinity: Similar to pod affinity, you have requiredDuringSchedulingIgnoredDuringExecution, preferredDuringSchedulingIgnoredDuringExecution, requiredDuringSchedulingRequiredDuringExecution, and preferredDuringSchedulingRequiredDuringExecution.
apiVersion: v1
kind: Pod
metadata:
  name: my-pod
spec:
  affinity:
    nodeAffinity:
      requiredDuringSchedulingIgnoredDuringExecution:
        nodeSelectorTerms:
        - matchExpressions:
          - key: gpu
            operator: Exists # Node must have the 'gpu' label
  # ... other pod specifications
Anti-affinity (both pod and node) is crucial for high availability. By spreading your pods across nodes and availability zones, you ensure that your application can survive node or zone failures. Makes it fault-tolerant in the event a node fails, the pods running on other nodes will continue to serve traffic. Affinity can also help you optimize resource utilization by co-locating related pods and ensuring that pods are scheduled on nodes with the appropriate resources. Co-locating pods that communicate frequently can reduce latency and improve performance. If you use node affinity, you might also need to use tolerations to allow pods to be scheduled on nodes with taints.
Note: Consider preferred Over required Unless it’s essential, use preferred affinity rules over required rules. required rules can make it difficult to schedule pods if the constraints cannot be met.

Horizontal Pod Auto Scaling (HPA)
HPA is one of the best knobs to control in the Data Plane that allows scaling your deployments horizontally based on metrics. You have out-of-the-box metrics like CPU and Memory available that you could scale on or even combine metrics for the scaler. In addition custom metrics relevant to your applications such as connection_pool, requests_per_second etc. could be configured that may provide a better trigger for your applications to inform the scaler.
Fine-tune behavior for HPA
HPA supports scaleUp and ScaleDown behaviors to be configured per your needs through scaling policies. One or more scaling policies can be specified in the behavior section of the spec. When multiple policies are specified the policy that allows the highest amount of change is the policy that is selected by default. The stabilizationWindowSeconds is used to restrict the flapping of replica count when the metrics used for scaling keep fluctuating and is important to get it right for your workloads.
Note: When HPA is enabled, it is recommended that the value of spec.replicas of the Deployment and / or StatefulSet be removed from their manifest(s). If this isn’t done, any time a change to that object is applied, this will instruct Kubernetes to scale the current number of Pods to the value of the spec.replicas key. This may not be desired and could be troublesome when an HPA is active, resulting in thrashing or flapping behavior.
Vertical Pod Auto Scaling (VPA)
The Vertical Pod Autoscaler (VPA) is a Kubernetes component that automatically adjusts the CPU and memory requests and limits of your pods. It analyzes the historical resource consumption of your pods such as peak usage, average usage, and resource usage trends, and then recommends or optionally can apply new resource settings to optimize resource utilization and improve overall cluster efficiency.
- Pair this with the Pod Disruption Budget as VPA’s Updater component could apply recommendations that require pod restarts to take effect.
- Starting with Recommender mode only, learning more about the recommendations and carefully monitoring your application are highly recommended best practices.
- A good starting point would be with either HPA or VPA, depending on your needs. If you need to scale based on traffic, use HPA. If you need to optimize per-pod resources, use VPA.
- In some specific use cases combining both may be required but note that contradicting recommendations for the scalers could make it complex to manage and troubleshoot. For instance, If both HPA and VPA are set to scale based on CPU or memory usage, they might contradict each other, leading to inefficient resource allocation. When using both HPA and VPA, consider using custom metrics for HPA to avoid conflicts with VPA’s resource adjustments.
Multi-Dimensional Pod Auto Scaler (Feature Request for EKS)
This is a feature request into EKS and would be great to support this in a future release to ease EKS users from having to juggle between HPA and VPA with a single AutoScaler that would eliminate contradicting scaling decisions.
Kubernetes Event-driven Autoscaling
KEDA (Kubernetes Event-driven Autoscaling) plays a crucial role in enhancing resilience on EKS (and Kubernetes in general) by enabling your applications to automatically scale based on various event triggers, rather than just CPU or memory usage. This event-driven autoscaling is key to building more responsive, robust, and cost-effective systems. You could certainly argue that custom metrics may come in handy and may suffice. However, when considering Event-Driven architectures, KEDA specifically shines in this space as it can scale based on a variety of scalers (e.g., RabbitMQ, Kafka, AWS SQS, PostgreSQL, Datadog, and many more), ensuring that your application can process messages as they arrive at scale. Combined with HPA, KEDA could prove to be a powerful tool in your kit to build resilient workloads!
Managing Computational Resources
Running resilient workloads would also mean thinking about your current computational resource utilization, requests, limits, quotas (QOS), and more. Please do check out Dive into managing Kubernetes computational resources which we published on this topic earlier. It dives into a lot more details and helps you gain insights into computational resources.
Self Healing with Kubernetes Probes
Kubernetes Probes allows Kubernetes to monitor the health and readiness of your pods and take action when issues arise, ensuring your application remains available and responsive. Needless to say how important probes are for running resilient and self-healing workloads. It is a good practice to configure these to strike a balance between speed and reliability, as you don’t want to configure thresholds too small that it takes several restarts to start one, nor do you want to bump thresholds up too much that delays traffic being routed to the pod that has been ready for a while. Highly recommend reading Dive into Kubernetes Healthchecks (2-part series) published earlier that will help you gain a solid understanding of the various probes and their impact on your workloads.
Run Lean or Distroless images
Running lean images or distroless images plays a significant role in EKS resiliency by improving security, reducing resource consumption, and speeding up deployments.
- Lean images and distroless images contain only the essential components needed to run your application. They eliminate unnecessary libraries, tools, and system utilities that might be present in traditional base images. This significantly reduces the attack surface, minimizing potential vulnerabilities that attackers could exploit. Lean images make it easier to audit your container images and ensure that they comply with security policies and go well with your
- Lean images and distroless images are significantly smaller in size compared to traditional base images and hence can be pulled more quickly from container registries, reducing the time it takes to deploy your application. This is especially important for scaling and rolling updates. Lean images often have a smaller memory footprint, allowing your applications to run more efficiently and potentially allowing you to run more pods on the same node.
- Smaller images lead to faster image pulls, which speeds up the deployment process and often results in faster startup times because they have fewer components to initialize. This can be crucial for applications that need to scale quickly or even for microservices that are frequently deployed or even in optimizing HPA.
Use a Service Mesh/Service Network
Service meshes like Istio, Consul, LinkerD, or a Service Network like VPC Lattice enable service-to-service communication and increase the observability and resiliency of your microservices network. Most service mesh products work by having a small network proxy run alongside each service that intercepts and inspects the application’s network traffic. You can place your application in a mesh without modifying your application. Using the service proxy’s built-in features, you can have it generate network statistics, create access logs, and add HTTP headers to outbound requests for distributed tracing, enable automatic request retries, timeouts, circuit-breaking, rate-limiting as well as improve security patterns.
Service Networks such as VPC Lattice have a different architecture that does not require one to configure proxies or sidecars. Instead, VPC Lattice provides a managed control plane and data plane, eliminating the need for additional components within your Pods.
Circuit Breaking, Retry, and Backoff
Circuit breakers are a powerful technique to improve resilience. By preventing additional connections or requests to an overloaded service, circuit breakers limit the “blast radius” of an overloaded service. The circuit-breaker pattern could be applied within your application that communicates with various upstream services, and or at the ingress controller or the service mesh if one was supported. This should also be paired with an appropriate Retry/Backoff mechanism where Retry/Backoff attempts to recover from temporary issues, and the circuit breaker steps in to prevent further attempts when the problem is more persistent. This combination makes your system more resilient to failures.
AWS Well-Architected Framework
Highly recommend that we consider the Well-Architected Framework AWS Well-Architected Framework which provides a structured approach to designing and operating resilient services, building and operating secure, high-performing, resilient, and efficient infrastructure for your applications and workloads in the AWS cloud. By adhering to its principles, you can build systems that are better equipped to withstand failures, recover quickly from disruptions, and provide consistent availability to your users. It’s about designing for failure, not just hoping it won’t happen. Please note that it’s not a managed service itself, but rather a conceptual model that provides a consistent approach to evaluating and improving your cloud architecture.
Resilience Assessment and Design For Failure
Photo by Francisco De Legarreta C. on Unsplash

It is best to assume that anything that can go wrong will go wrong
The National Academy of Sciences defines resilience as “the ability to prepare and plan for, absorb, recover from, or more successfully adapt to actual or potential events”.
It’s always a good practice to test and see how your design choices hold when failures are induced. Chaos engineering can be used to validate the effectiveness of design choices made with “ designing for failure ” in mind. Chaos could be induced into your workloads and clusters in various ways, ranging from inducing node restarts, pod restarts, triggering failover, etc. It is also a good idea to use something like AWS Fault Injection Service in combination with Behavior Driven Development (BDD) or similar for managing your experiments and most importantly orchestrating the expected behavior.
AWS Resilience Hub
Leverage AWS Resilience Hub to manage and improve the resilience posture of your applications on AWS. AWS Resilience Hub enables you to define your resilience goals, assess your resilience posture against those goals, and implement recommendations for improvement based on the AWS Well-Architected Framework. Within AWS Resilience Hub, you can also create and run AWS Fault Injection Service (AWS FIS) experiments, which mimic real-life disruptions to your application to help you better understand dependencies and uncover potential weaknesses. AWS Resilience Hub provides you with the services and tooling you need to continuously strengthen your resilience posture, all in a single place.
Secure your traffic with AWS WAF and AWS Shield
WAFs are a critical component of resilient workloads. They protect against application-level attacks, enhance availability, support incident response, enable safe deployments, and help organizations meet compliance requirements. While not a replacement for other security measures, a properly configured and maintained WAF provides a valuable layer of defense for any publicly accessible web application on EKS.
While AWS Shield provides DDoS protection at the network layer, AWS WAF can protect against application-layer DDoS attacks. Combining these AWS solutions with EKS can help harden your services, and improve your availability and resilience.
Golden Signals
The Golden Signals are high-level indicators of service health and performance.
Photo by Mikail McVerry on Unsplash

Data plane observability provides the underlying data that feeds these signals. By monitoring the Golden Signals, you can gain a quick understanding of the state of your services and take action to ensure their reliability and resilience. Some key aspects for operating and managing production workloads:
- Setting SLOs (Service Level Objectives): Define target values for your Golden Signals (e.g., “99.9% of requests should have a latency of less than 200ms”). These SLOs become your key performance indicators (KPIs) for service reliability.
- Alerting: Set up alerts based on your SLOs. If a Golden Signal deviates significantly from its target, you’ll be notified so you can investigate.
- Troubleshooting: When an issue occurs, use the Golden Signals to quickly understand the impact. For example, if you see a spike in latency, you can investigate further using traces and logs.
- Capacity Planning: Use traffic and saturation metrics to understand your capacity needs and plan for future growth.
- Performance Optimization: Identify bottlenecks by analyzing latency and saturation metrics.
- Tooling: Use appropriate tooling such as APM to provide end-to-end observability and traceability for your infrastructure. AWS X-Ray is a good choice and an invaluable tool for enhancing observability in your EKS environment. It provides detailed distributed tracing, improves your understanding of Golden Signals, and ultimately contributes to building more resilient and performant applications. By enabling faster root cause analysis, proactive issue detection, and performance optimization, X-Ray empowers you to operate your workloads more effectively and ensure a better user experience.
Summary
As you may have figured out by now, operating resilient workloads requires quite a bit of planning and effort. Of course, EKS makes lives easier as described with EKS auto mode and Karpenter, but one has to still focus on optimizing and securing their data planes. I hope this article leaves you with a reasonable understanding of the knobs you could turn to make your critical services highly available and resilient! Lastly leaving a bunch of reference materials that were an inspiration to this article and may come in handy along your journey for operating resilient workloads on Kubernetes! Cheers!
References
- https://aws.amazon.com/blogs/containers/operating-resilient-workloads-on-amazon-eks/
- https://docs.aws.amazon.com/whitepapers/latest/running-containerized-microservices/design-for-failure.html
- https://aws-observability.github.io/observability-best-practices/recipes/eks/
- https://aws.amazon.com/blogs/architecture/behavior-driven-chaos-with-aws-fault-injection-simulator/
- https://aws.amazon.com/blogs/containers/managing-pod-scheduling-constraints-and-groupless-node-upgrades-with-karpenter-in-amazon-eks/
- https://aws.amazon.com/eks/auto-mode/
- https://kubernetes.io/docs/concepts/services-networking/topology-aware-routing/
- https://aws.amazon.com/blogs/containers/blue-green-or-canary-amazon-eks-clusters-migration-for-stateless-argocd-workloads/
- https://docs.aws.amazon.com/eks/latest/best-practices/cas.html
- https://aws.amazon.com/blogs/aws/introducing-karpenter-an-open-source-high-performance-kubernetes-cluster-autoscaler/
- https://docs.aws.amazon.com/eks/latest/best-practices/application.html
Thanks to Jonathan Dawson for the feedback on this article!