Kubernetes CNI that is Container Network Interface is a standardized framework that helps Kubernetes configure network connectivity between containers.
Calico is a popular Kubernetes networking solution. This is due to its flexibility, performance and robust security capabilities
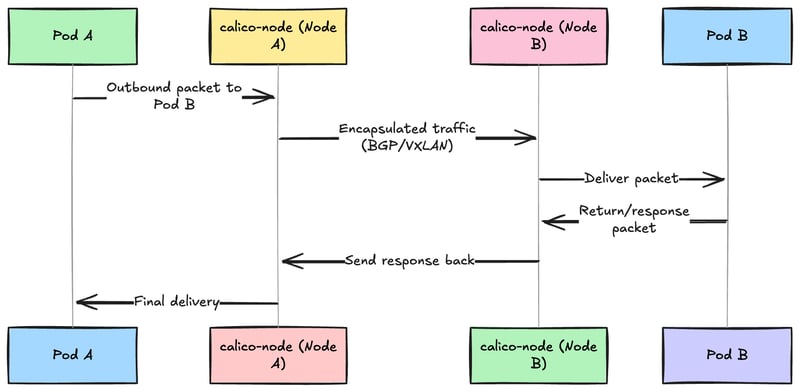
Calico uses the standard networking protocols such as BGP and VXLAN, thus it is simple and efficient in large scale deployments
Calico also has built in support for Kubernetes network policies that gives you fine grained control over pod to pod communication
It has an active community, compatibility with different cloud platforms and easy installation and maintenance features which have contributed to its widespread adoption
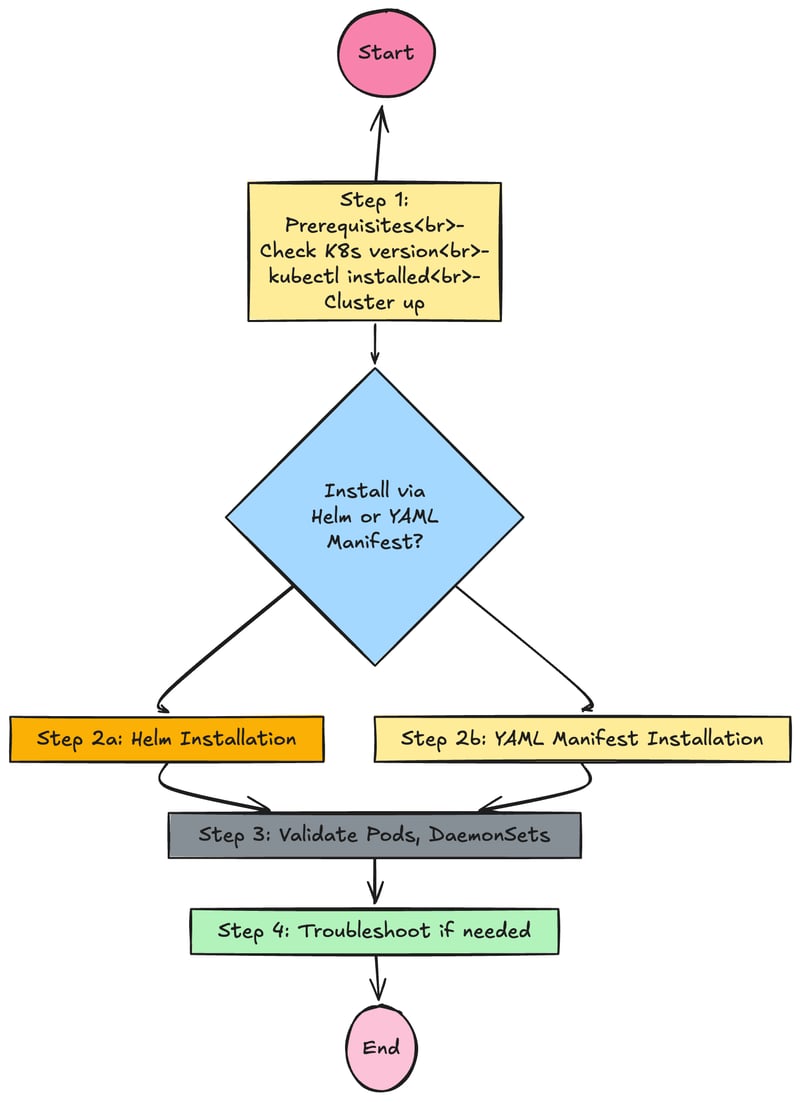
Step by Step Installation of Calico CNI
Step 1: Prerequisites and Preparation
Before installing Calico, make sure that your Kubernetes cluster meets the essential prerequisites like
- Verify the correct kubernetes version and configuration
- Kubernetes version 1.25 or newer is required
- Make sure that your local machine has kubectl command-line tool installed and configured correctly. You can verify the connectivity to your cluster using
kubectl version --short
kubectl cluster-info
here is the expected output that you should see
Client Version: v1.28.1
Server Version: v1.28.1
Network Considerations
Decide on your Kubernetes pod network CIDR. Calico uses 192.168.0.0/16 by default, but you can customize this based on your needs and network requirements
Open the required ports on the firewall rules and security groups (BGP, TCP 179, VXLAN, UDP 4789)
Step 2: Deploy Calico Manifest
You can install the Calico through Helm Chart or through traditional YAML manifest method
Option A: Installing Calico using Helm Chart (Recommended)
Helm has many advantages like easy upgrades, rollbacks and management. Here’s a step by step method of installing Calico
Check the Helm Version
helm version
Expected Output
version.BuildInfo{Version:"v3.14.3", GitCommit:"abcdef", GitTreeState:"clean", GoVersion:"go1.21.4"}
Add Calico Helm repository
helm repo add projectcalico https://docs.tigera.io/calico/charts
helm repo update
Update the repositories to fetch the latest charts
helm repo update
Install Calico helm chart
this command installs and deploys Calico using Helm
helm install calico projectcalico/tigera-operator
  --namespace tigera-operator
  --create-namespace
recommended operator method using Helm
This installs the Tigera Operator, which manages the Calico automatically
Explanation of the command
- helm install calico: Install Calico helm chart with the name calico
- projectcalico/tigera-operator : Specifies the Calico operator chart
- –namespace tigera-operator : deployed the operator in the dedicated namespace
- –create-namespace : helm creates a new namespace if it does not already exit
expected output
NAME: calico
LAST DEPLOYED: Tue Mar 10 13:45:33 2025
NAMESPACE: tigera-operator
STATUS: deployed
REVISION: 1
Here the calico pods will be automatically be deployed into the calico-system namespace by the operator.
Option B: Installing Calico using the YAML Manifest
Step 1 Confirm the Prerequisites
you need the following
- Kubernets Cluster v 1.27+
- Kubectl CLI installed and configured
- Appropriate permissions to deploy resources, admin privileges.
you can confirm the Kubernetes version easily by
kubectl version --short
Step 2: Obtain the Calico YAML manifest
Calico has ready to use YAML manifest the you can use to install.
- Download Calico from the official source:
https://github.com/projectcalico/calico/releases - run this command to download the manifest
curl -O https://raw.githubusercontent.com/projectcalico/calico/v3.28.3/manifests/calico.yaml
Step 3 Customize the YAML manifest (Optional but recommended)
By default the Calico uses the standard Cluster CIDR that is 192.168.0.0/16
If you have a Kubernetes Cluster that is using a different CIDR than edit the downloaded YAML file
- Edit the file
calico.yaml
nano calico.yaml
- Locate and adjust the CIDR block in the file
# - name: CALICO_IPV4POOL_CIDR
#   value: "192.168.0.0/16"
- Uncomment and modify your Kubernetes CIDR like so
- name: CALICO_IPV4POOL_CIDR
  value: "10.244.0.0/16"
  # (your kubernetes cluster CIDR)
Save and exit.
Apply the YAML manifest to deploy Calico
Run the below command
kubectl apply -f calico.yaml
This will deploy the required resources for Calico
- Calico-node DaemonSet
- Calico Kube-controllers Deployment
- RBAC roles, service accounts and configuration settings
Here is the expected output
configmap/calico-config created
daemonset.apps/calico-node created
deployment.apps/calico-kube-controllers created
serviceaccount/calico-node created
...
Step 3 Validate the Calico Installation
Once you have installed, it is important to verify and check if the Calico is running properly
- Verify Calico Pods status
You can check the health of Calico Pods using
kubectl get pods -n tigera-operator
kubectl get pods -n calico-system
All the pods should be running. You can wait for some time if you see some pods Pending or ContainerCreating states
Example of an expected output
NAMESPACE          NAME                                      READY   STATUS    RESTARTS   AGE
tigera-operator    tigera-operator-6c7f56754d-h6f4p          1/1     Running   0          2m30s
calico-system      calico-node-8vkwz                         1/1     Running   0          2m
calico-system      calico-kube-controllers-5f7c8b6f9-vrvp2   1/1     Running   0          2m
- Check Nodes to confirm Calico Network Readiness
You can confirm that Kubernetes nodes are recognizing Calico as their CNO plugin by
kubectl get nodes -o wide
The nodes should give out a ready status. you can also see that the Calico IP addresses assigned to the nodes and pods.
Validating Installation and Basic troubleshooting
Verification of Calico Installation
You can confirm that the calico has successfully deployed and is in running state
kubectl get pods -n calico-system
Here is the expected output
NAME                                       READY   STATUS    RESTARTS   AGE
calico-node-5m9kp                          1/1     Running   0          3m
calico-node-kxl7g                          1/1     Running   0          3m
calico-kube-controllers-6b59bcd985-9qgzm   1/1     Running   0          3m
pods are working and are in the running state and ready state. This indicates a successful deployment.
basic troubleshooting guide
Issue 1 : Pods in CrashLoopBackOff
Identify the issue by running the command
kubectl describe pod  -n calico-system
kubectl logs  -n calico-system
- General reasons for this error
- Insufficient permissions or RBAC misconfiguration
- Incorrect cluster CIDR
Issue 2: Network Policies are not being enforced
- Check Calico
DeamonSetsand pod status.
kubectl get daemonset -n calico-system
kubectl describe daemonset calico-node -n calico-system
- General Solutions
- Make sure that the Calico CNI is set as the default Kubernetes network plugin
- Verify if there are any conflicting CNI plugins presents. remove conflicting plugins before reinstalling Calico
Quick Connectivity check
to do a quick connectivity check, deploy two pods in different namespaces and do a ping test.
kubectl create namespace test-ns1
kubectl create namespace test-ns2

kubectl run test-pod-1 --namespace=test-ns1 --image=busybox -- sleep 3600
kubectl run test-pod-2 --namespace=test-ns2 --image=busybox -- sleep 3600

kubectl exec -it test-pod-1 -n test-ns1 -- ping test-pod-2.test-ns2
- If the ping is successful then the connection is working
- After this, you can apply Calico policies and validate enforcement.
Inspect Pod logs
kubectl logs -n kube-system
Verify Node Health
kubectl get daemonset calico-node -n kube-system
Check Calico Nodes status
kubectl get nodes -o wide
Topic 1: Securing Cluster traffic with Calico Network Policies
What are Calico Network Policies?
Calico network policies are rules that are defined by administrators to allow to deny traffic between Kubernetes pods and namespaces
they extend the built in Kubernetes network policies providing advanced features and granular control
- Namespace to namespace control (thus allowing specific namespace to communicate)
- Pod level policy enforcement is based on labels
- Ability to explicitly allow or deny actions ( traditional Kubernetes policies only support allow rules explicitly)
- Rich Selector capabilities that are based on pod labels, namespaces and service accounts
To significantly reduce attach surface potential and increase the cluster security, Calico network policies enables Kubernetes admins to enforce security easily