This article is a step by step guide for installing and configuring HAProxy Ingress controller.
In Kubernetes, an Ingress controller is used for routing any external traffic to the cluster’s internal services.
The Ingress controller translates the incoming requests from outside the cluster to the correct pods based on hostnames, paths and any other routing rules
HAProxy is know for its high performance, low resource usage and its extensive configuration options.
It provides robust load balancing, reliability and easy scalability. This makes HAProxy a solid choice for production environments.
- Introduction
- Installing HAProxy Ingress Controller in Kubernetes
- Pre-Installation Checklist
- Installation Steps
- Option A: Using Helm
- Option B: Using YAML Manifests
- Validating Installation
- Configuring HAProxy Ingress Controller
- Basic HAProxy Ingress Controller
- SSL/TLS Configuration
- Load Balancing Algorithms
- Advanced Routing Features
- Path Based Routing
- Host Based Routing
- TCP VS HTTP Routing
- Annotations and Custom Config
- Fine tuning timeouts, buffer sizes and connection limits
– Using a ConfigMap for Global Settings
Introduction
The HAProxy Ingress controller has features such as
- Advanced traffic routing ( host based, path based)
- SSL termination
- Rate limiting options
- Dynamic reconfiguration
- Automatically updates the routes and backends when there are changes in the cluster
Because of these features, it has faster response time, efficient load balancing and reliable connection management. Its advanced traffic management capabilities lets you maintain high availability even during peak hours and unexpected surges.
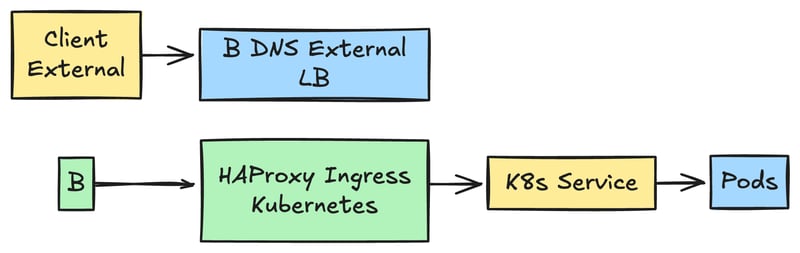
Installing HAProxy Ingress Controller in Kubernetes
In this section we are going to learn about How to get up and running with HAProxy Ingress Controller in your Kubernetes cluster.
We will go through a quick pre-installation checklist, dive into 2 main methods of deployment that are Helm and YAML manifests and lastly verify that our setup is complete with a simple test.
Pre-Installation Checklist
Important Points
- We need a running Kubernetes cluster, we are using K0s but you can use any Kubernetes cluster
- You need kubectl to communicate with your cluster
- Basic understanding of Pods, Services and Ingresses
- Kubernetes Version Compatibility
a. Before you install the HAProxy make sure that your Kubernetes cluster is on a supported version. Kubernetes version 1.20 are generally supported but you can also check out the HAProxy documentation to make sure.
b. Newer Kubernetes functions such as, custom resource definitions and advanced networking policies, will require more up-to-date versions
- Access and Permissions
a. You will need Kubectl or a similar CLI tool installed and configured on your system in order to communicate with your cluster kubectl get pods should work
b. If you are using Helm to deploy then you require the Helm version 3.x and up installed.
c. If you are deploying using platforms like Rancher and others then make sure that user or service account has correct permissions like namespace retention, RBAC rules etc.
- Networking Requirements
a. Always make sure the cluster’s networking solution supports the Service type you are planning on using like for example NodePort. LoadBalancer or ClusterIP
b. For external load balancing for an on premise solution you can use EdgeLB. or you can use a cloud providers load balancer when running on the cloud
c. If you want to expose the services publicly through ingress, then configure DNS records to point the external IP or domain name associated with your cluster.

Installation Steps
You can install the HAProxy Ingress Controller in two main ways:
By using the Helm (recommended for simpler upgrades and easy configuration changes via values.yaml )
By applying YAML manifests directly (Offers more granular control, it can be more manual to manage the updates )
Option A: Using Helm
- Add the HAProxy Ingress Helm repository
helm repo add haproxy-ingress https://haproxytech.github.io/helm-charts
helm repo update
The above command adds the official HAProxy Ingress Helm repository to your local Helm client, it then updates the local client to the latest chart versions.
-
Configure Necessary
values.yamlParameters -
SSL certificates: If you want to manage the SSL at the Ingress level, you have specify or mount the certificates using your Helm values.
-
Load Balancing Settings: You can setup your preferred load balancing algorithm like round robin or least connections or any other option.
-
Service Type: You can adjust whether the service for the controller is a LoadBalancer, NodePort, or a ClusterIP. The choice you make impacts how the external traffic is routed.
controller:
  service:
    type: LoadBalancer
  config:
    # Example: set the max number of connections
    maxconn: 1000
- Install with Helm
Run the below command to deploy the HAProxy Ingress Controller into your Cluster
helm install haproxy-ingress/haproxy-ingress --namespace --create-namespace -f values.yaml
This command install the chart, applies the configurations form your values.yaml. Replace and as needed
Option B: Using YAML Manifests
-
Obtain official or community manifests
-
This is the official YAML manifest from the HAProxy GitHub repository.
-
The command will create a haproxy-controller namespace and deploy the HAProxy Ingress Controller Pods within it.
kubectl apply -f https://raw.githubusercontent.com/haproxytech/kubernetes-ingress/refs/heads/master/deploy/haproxy-ingress.yaml
Creating the IngressClass
Kubernetes recommends creating an IngressClass resource to identify which ingress controller to use. This creates a file called ingressclass.yaml
apiVersion: networking.k8s.io/v1
kind: IngressClass
metadata:
  name: haproxy
spec:
  controller: haproxy.org/ingress-controller
you can apply it with
kubectl apply -f ingressclass.yaml
This declares an IngressClass with the name haproxy, which you can reference in the Ingress definition
Validating Installation
- Confirm Pods, Services and Deployments
a. To confirm the HAProxy Ingress Controller is running correctly:
b. Runkubectl get pods --namespace haproxy-controllerin order to list all HAProxy Controller pods.
Example Output
NAME                                         READY   STATUS    RESTARTS        AGE
haproxy-kubernetes-ingress-bc8f75995-p5tdd   1/1     Running   1 (4m30s ago)   7h23m
You can see atleast one Running pod for the HAProxy Ingress Controller
- Run
kubectl get service --namespace haproxy-controllerin order to check Services associated with the HAProxy Controller.
2.Run kubectl describe pods --namespace haproxy-controller if more details are needed on the individual pods.
3.Use kubectl get pods,svc.deploy -n to ensure that the HAProxy Ingress Controller Pods are running without any errors
1.Make sure the Pods are in a “Running” state without errors. Check the service type, External-IP, and PORTS to see how traffic is routed.
In the next section we will be processing with some advanced configurations such as SSL offloading, custom routing rules and performance tuning.
But for now, we have mastered the basics and thus we can begin routing external traffic into our Kubernetes cluster easily.
Checking the Services
kubectl get service --namespace haproxy-controller
Example Output
NAME                         TYPE       CLUSTER-IP       EXTERNAL-IP   PORT(S)                                     AGE
haproxy-kubernetes-ingress   NodePort   10.110.185.192           80:30337/TCP,443:30739/TCP,1024:31651/TCP   7h24m
You can verify that the service is of type NodePort and is exposing the ports for the HTTP (port 80) and HTTPS (port 443) and the health check and the stats port 1024
Describing the Pods
For more detailed information, you can also describe the HAProxy Ingress pods
kubectl describe pods --namespace haproxy-controller
Review the output to make sure that there are no errors or warnings, You should be able to see the entries indicating successful pulling of the HAProxy image and the container is in a Running state.
HAProxy Ingress example
to use the HAProxy IngressClass in your services, you have to create an Ingress resources that references the IngressClass. Here is an example
apiVersion: networking.k8s.io/v1
kind: Ingress
metadata:
  name: hello-ingress
spec:
  ingressClassName: haproxy
  rules:
    - host: hello-world.example.com
      http:
        paths:
        - path: /
          pathType: Prefix
          backend:
            service:
              name: hello-world-service
              port:
                number: 80
By specifying the ingressClassName:haproxy , you instruct the Kubernetes to route the traffic for the host/path to the HAProxy Ingress Controller.
Configuring HAProxy Ingress Controller with Example
In this section, we are going to learn how to configure your HAProxy Ingress Controller.
First we are going to walk through some fundamental settings like
- creating Ingress resources
- Applying SSL certificates
- and Choosing the right load balancing algorithm
-
Then we are going to move on to
-
sophisticated routing
-
Annotations
-
Custom configurations
-
monitoring strategies
HAProxy Ingress Controller
Ingress resources
Purpose: Ingress resources define: “how the external traffic is routed to internal Kubernetes services”.
You will specify the hostnames, paths, and which backend service each path should forward the traffic to
Host rules:
A general Ingress manifest includes spec.rules.host such as hello-world.com
Requests hitting the hello-world.com are then routed according to the rules that you define
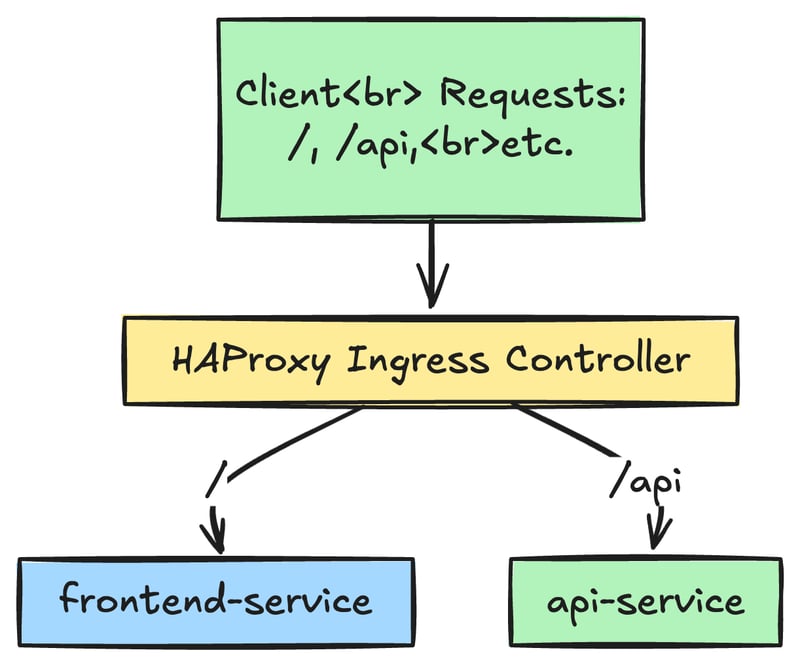
Paths and Backend services
Under the rules, you have to declare the specific paths like so / or /api and map them to different services and ports in the cluster
For example, the traffic to /api can go to api-service:80, in contrast to / can go to frontend-service
Now we consider an example of a Pod and a Service that you can use along with your ingress in a real life scenario
A Pod: Runs the nginxdemos/hello container on port 80
A Service: This service targets the Pod using the app: hello-world label
An Ingress: The ingress routes the traffic from hello-world.example.com to hello-world-service on port 80
Our provided HAProxy ingress will then route the traffic to this service
# ----------------------
# Pod definition
# ----------------------
apiVersion: v1
kind: Pod
metadata:
  name: hello-world-pod
  labels:
    app: hello-world
spec:
  containers:
  - name: hello-world
    image: nginxdemos/hello:latest
    ports:
    - containerPort: 80

---
# ----------------------
# Service definition
# ----------------------
apiVersion: v1
kind: Service
metadata:
  name: hello-world-service
spec:
  selector:
    app: hello-world
  ports:
    - protocol: TCP
      port: 80
      targetPort: 80

---
# ----------------------
# Ingress definition
# ----------------------
apiVersion: networking.k8s.io/v1
kind: Ingress
metadata:
  name: hello-ingress
  annotations:
    kubernetes.io/ingress.class: "haproxy"
spec:
  rules:
  - host: hello-world.example.com
    http:
      paths:
      - path: /
        pathType: Prefix
        backend:
          service:
            name: hello-world-service
            port:
              number: 80
Steps to run locally on a Debian or Ubuntu Machine
-
Install the Kubernetes tools
a. Make sure you have a Kubernetes cluster running
b. Make sure that kubectl is installed and configured so kubectl get pods works -
Apply the YAML to your Cluster
kubectl apply -f hello.yaml
This will create the Pod, Service and the Ingress resources.
-
Update the
/etc/hoststhis is a local DNS trick -
Because the ingress rule uses the domain name hello-world.example.com, you can easily map this domain to your cluster IP address on your Debian machine
-
For local testing find the ip address on which your cluster is running
minikube ip
Suppose you find out the ip is 192.168.32.54 then edit the /etc/hosts file on your Debian or Ubuntu machine like so
sudo nano /etc/hosts
then
192.168.49.2  hello-world.example.com
## remember 192.168.49.2 is the ip of your kubernetes cluster
- Verifying the Ingress
Verify the HAProxy Ingress controller is running
check the created Ingress
kubectl get ingress
Example output
NAME            CLASS     HOSTS                     ADDRESS   PORTS   AGE
hello-ingress   haproxy   hello-world.example.com             80      6h58m
Observe that:
- The ingress name is
hello-ingress - The class is set to
haproxy - The host is
hello-world.example.com
Identifying the NodePort
Since the HAProxy Ingress controller is running as a NodePort you need the port number to send the external traffic to the cluster. run the below command
kubectl get service --namespace haproxy-controller
You will get output something like this
NAME                         TYPE       CLUSTER-IP       EXTERNAL-IP   PORT(S)                                     AGE
haproxy-kubernetes-ingress   NodePort   10.110.185.192           80:30337/TCP,443:30739/TCP,1024:31651/TCP   7h31m
From here you can see the port 30337 is the nodeport which is mapped to port 80 of the Ingress Controller
- Sending a test request
Let us assume your kubernetes node IP addresss is 172.16.51.8, you can test the ingress routing is working by sending a curl request that includes the host header like so
curl http://172.16.51.8:30337/ -H 'Host: hello-world.example.com'
If everything is configured correctly, you should see the Nginx demo page output from the hello-world Pod.
Open the browser on your Debian machine and go to or use curl
http://hello-world.example.com:30337
or
curl http://hello-world.example.com:30337
you can see the response coming from your Kubernetes cluster

SSL/TLS Configuration
Securing the traffic using SSL/TLS is an important step in production deployments
1.Generating and importing certificates
- You can generate the Let’s Encrypt certificate using a Cert Manager or a standalone process
- Alternatively, you can also import your existing certificates from a Certificate Authority.
- The certificate are typically stored as a Kubernetes Secret resource
- Configuring HTTPS & Redirections
- Update the Ingress controller to reference the TLS secret
- Enforce the HTTPS using annotations, such as haproxy.org/ssl-redirect: “true”
- This makes sure that all the HTTP traffic is automatically redirected to HTTPS
Example
apiVersion: networking.k8s.io/v1
kind: Ingress
metadata:
  name: my-app-ingress-tls
  annotations:
    kubernetes.io/ingress.class: "haproxy"
    haproxy.org/ssl-redirect: "true"
spec:
  tls:
  - hosts:
    - hello-world.com
    secretName: hello-world-com-tls
  rules:
  - host: hello-world.com
    http:
      paths:
      - path: /
        pathType: Prefix
        backend:
          service:
            name: secured-service
            port:
              number: 443
Load Balancing Algorithms
By default, the HAProxy uses the round-robin algorithm, this sends the requests to each backend service in turn.
If there are 4 backends a,b,c,d the round robin algorithm will first send the request to a then b then c and then d and then again to a, thus cycling through all 4 backend services
Depending on your environment, you might prefer other algorithms such as
- Least Connections: Sends a new request to the server that has the fewest active connections, this is a good choice for evenly distributing load.
- Source IP Hash/ Sticky Sessions: Useful if you want a user to consistently hit the same backend server
- Advanced Algorithms: Weighted round robin, random or specialized health checks algorithms are also there for specific use-cases.
- You can configure this in the ConfigMap or via annotations for HAProxy Ingress Controller
apiVersion: v1
kind: ConfigMap
metadata:
  name: haproxy-config
  namespace: ingress-controller
data:
  backend-global-default-settings: |
    balance leastconn
The above snippet instructs HAProxy to use the leastconn algorithm across all backends wherever it is applicable
Advanced Routing Features
Path Based Routing
In micro services environment, you often spilt you application into multiple components for example /api, /admin, /auth
With HAProxy Ingress
Mapping Multiple Contexts: Each Path in a single Ingress resource can point to a different internal service.
Common Use Case: A front-end that is served by a react or angular SPA /, a back-end API on /api and an admin dashboard /admin
Host Based Routing
Sometimes you have multiple domains that are sharing a single Kubernetes cluster for example app1.example.com and app2.example.com
Host based rules allows us to split the traffic based on the domain name
for example
apiVersion: networking.k8s.io/v1
kind: Ingress
metadata:
  name: multi-site-ingress
  annotations:
    kubernetes.io/ingress.class: "haproxy"
spec:
  rules:
  - host: app1.example.com
    http:
      paths:
      - path: /
        pathType: Prefix
        backend:
          service:
            name: service-app1
            port:
              number: 80
  - host: app2.example.com
    http:
      paths:
      - path: /
        pathType: Prefix
        backend:
          service:
            name: service-app2
            port:
              number: 80
Each domain has its own rule that is pointing to its own distinct back-end service
TCP VS HTTP Routing
- HTTP/HTTPS Routing: The most common scenario is using the L7 (i.e the application layer) features like path based routing, headers and cookies
- TCP Routing: Applications such as databases, custom TCP protocols and others can be routed at layer 4.
- HAproxy is configured to forward the TCP traffic without inspecting the HTTP layer
- If you want to expose a database service externally or provide custom ports, you can set up a TCP ingress resource.
- This is generally done using specialized CRDs or configuration in the HAProxy Ingress chart
Annotations and Custom Config
HAProxy supports a variety of annotations that fine tune the behaviour at the route or at the controller level
Fine tuning timeouts, buffer sizes and connection limits
- Timeouts: You can set for how long the HAProxy will wait for an HTTP response before closing the connection or returning and error. for example: haproxy.org/backend-timeout: “30000” in milliseconds
- Buffer Zones: This is useful for large headers and big payloads.
- Connection Limits: protects your backend services by limiting the total number of connections it can handle.
Example:
annotations:
  haproxy.org/backend-timeout: "30000"      # 30 seconds
  haproxy.org/maxconn: "500"
Using a ConfigMap for Global Settings
You can define some global HAProxy settings via the ConfigMap:
apiVersion: v1
kind: ConfigMap
metadata:
  name: haproxy-ingress-config
data:
  global: |
    tune.bufsize 32768
    # Increase buffer size for large requests
  backend-global-default-settings: |
    timeout connect 5s
    timeout client 30s
    timeout server 30s
Each key in the ConfigMap can override defaults for things like timeouts, SSL capers and log formats.
Merging Custom HAProxy Configuration Sections
If you need advanced customization like Lua scripts, specialized logging or rewriting the riles.
Using HAProxy Ingress you can append or merge configuration snippets like so
data:
  frontend: |
    # Additional configuration in the frontend section
    acl needs_auth path_beg /admin
    http-request auth realm "Restricted Access" if needs_auth
  backend: |
    # Additional backend config
    option forwardfor
    http-request set-header X-Forwarded-Proto https if { ssl_fc }
The merged sections are appended to the final HAProxy config, this gives you flexibility without rewriting the entire file.
Monitoring and Observability
A solid Observability stack means that you can spot and troubleshoot the errors early and maintain high availability
Integrating with Prometheus and Grafana
Prometheus can scrape the metrics that are exposed by the HAProxy Ingress Controller. You can configure the Ingress controller to export the metrics to an endpoint like 8080/metrics
Grafana dashboards lets you visualize the data like request rates, response times and other such data.
Key metrics to Monitor
request_rate
http_response_status
backend_up
latency:
thanks