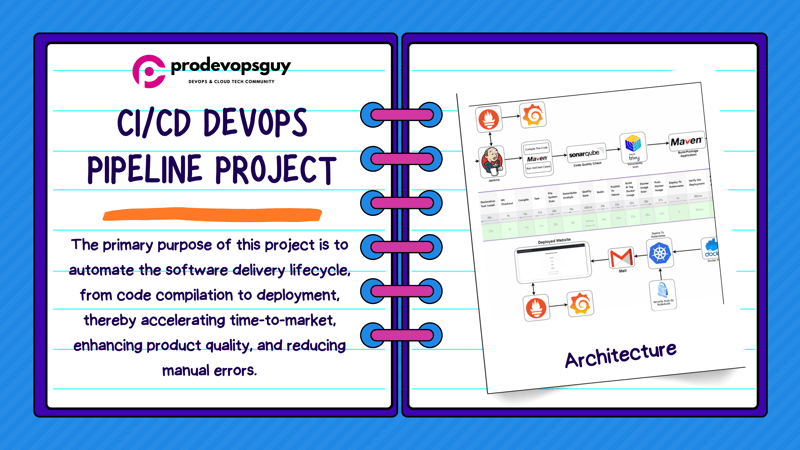
Introduction
In today’s fast-paced software development environment, implementing DevOps practices is crucial for organizations striving for agility, efficiency, and high-quality software delivery. This project demonstrates the implementation of a robust Continuous Integration/Continuous Deployment (CI/CD) pipeline using Jenkins, automating the entire software lifecycle from development to deployment.
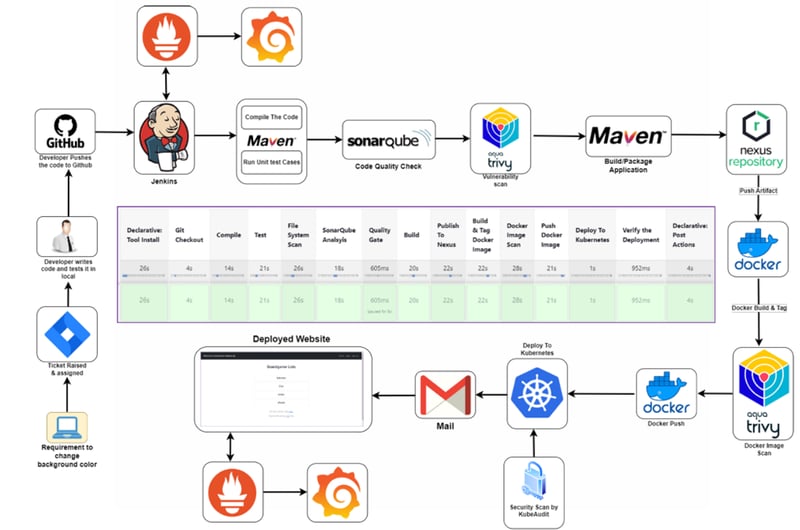
Architecture
Objectives
The primary goal of this project is to automate software delivery, improving speed, reliability, and efficiency while minimizing manual intervention. The key objectives include:
- Automated CI/CD Pipeline: Implementing a seamless Jenkins-based CI/CD pipeline to streamline build, test, and deployment processes.
- Integration of DevOps Tools: Utilizing Maven, SonarQube, Trivy, Nexus Repository, Docker, Kubernetes, Prometheus, and Grafana for end-to-end automation.
- Code Quality & Security: Enhancing software quality through static code analysis (SonarQube) and security vulnerability scanning (Trivy).
- Scalable Deployments: Ensuring reliable, scalable, and load-balanced deployments on a Kubernetes cluster.
- Automated Notifications: Enabling email alerts for build and deployment status.
- Robust Monitoring & Alerting: Implementing Prometheus and Grafana for real-time system health monitoring and performance analysis.
Tools & Technologies Used
| Tool | Purpose |
|---|---|
| Jenkins | CI/CD pipeline orchestration |
| Maven | Build automation and dependency management |
| SonarQube | Static code analysis for quality assurance |
| Trivy | Docker image vulnerability scanning |
| Nexus Repository | Artifact management and version control |
| Docker | Containerization for consistency and portability |
| Kubernetes | Container orchestration for scalable deployments |
| Gmail Integration | Email notifications for build and deployment updates |
| Prometheus & Grafana | Monitoring and visualization of system metrics |
| AWS EC2 | Infrastructure provisioning and hosting |
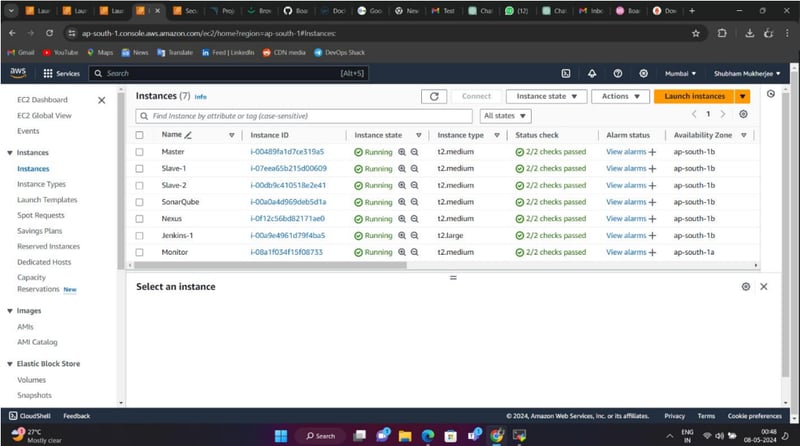
Infrastructure Setup: Virtual Machines on AWS
To support this pipeline, AWS EC2 instances were provisioned for various DevOps tools:
🔹 Kubernetes Master Node: Manages cluster state, scheduling, and coordination.
🔹 Kubernetes Worker Nodes (2): Host and execute containerized applications.
🔹 SonarQube Server: Performs static code analysis to ensure code quality.
🔹 Nexus Repository Manager: Manages build artifacts, dependencies, and Docker images.
🔹 Jenkins Server: Orchestrates CI/CD processes and integrates DevOps tools.
🔹 Monitoring Server: Runs Prometheus and Grafana for real-time system monitoring.
Each instance is configured with the necessary CPU, memory, and storage resources. Security best practices such as access controls and network configurations were applied to safeguard infrastructure.
EC2 Instances :
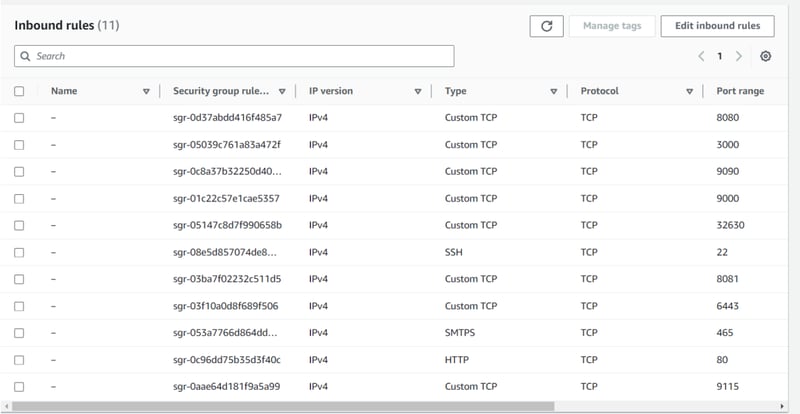
Security Group:
Setting Up Kubernetes Cluster with Kubeadm
Prerequisites
- Ubuntu OS (Xenial or later) with sudo privileges
- t2.medium instance type or higher
- Internet access
- Ensure all AWS instances are in the same Security Group
- Open port 6443 to allow worker nodes to join the cluster
1️⃣ Prepare Nodes for Kubernetes Installation
Run the following commands on both Master and Worker nodes:
# Disable swap
sudo swapoff -a
Load required kernel modules:
cat <<EOF | sudo tee /etc/modules-load.d/k8s.conf
overlay
br_netfilter
EOF

sudo modprobe overlay
sudo modprobe br_netfilter
Set sysctl parameters:
cat <<EOF | sudo tee /etc/sysctl.d/k8s.conf
net.bridge.bridge-nf-call-iptables = 1
net.bridge.bridge-nf-call-ip6tables = 1
net.ipv4.ip_forward = 1
EOF

sudo sysctl --system
2️⃣ Install CRI-O Runtime
sudo apt-get update -y
sudo apt-get install -y software-properties-common curl apt-transport-https ca-certificates gpg

sudo curl -fsSL https://pkgs.k8s.io/addons:/crio:/prerelease:/main/deb/Release.key | sudo gpg --dearmor -o /etc/apt/keyrings/cri-o-apt-keyring.gpg

echo "deb [signed-by=/etc/apt/keyrings/cri-o-apt-keyring.gpg] https://pkgs.k8s.io/addons:/cri-o:/prerelease:/main/deb/ /" | sudo tee /etc/apt/sources.list.d/cri-o.list

sudo apt-get update -y
sudo apt-get install -y cri-o
sudo systemctl enable crio --now
3️⃣ Install Kubernetes Packages
curl -fsSL https://pkgs.k8s.io/core:/stable:/v1.29/deb/Release.key | sudo gpg --dearmor -o /etc/apt/keyrings/kubernetes-apt-keyring.gpg

echo 'deb [signed-by=/etc/apt/keyrings/kubernetes-apt-keyring.gpg] https://pkgs.k8s.io/core:/stable:/v1.29/deb/ /' | sudo tee /etc/apt/sources.list.d/kubernetes.list

sudo apt-get update -y
sudo apt-get install -y kubelet=1.29.0-* kubectl=1.29.0-* kubeadm=1.29.0-*
4️⃣ Initialize Kubernetes Cluster on Master Node
sudo kubeadm config images pull
sudo kubeadm init

mkdir -p "$HOME"/.kube
sudo cp -i /etc/kubernetes/admin.conf "$HOME"/.kube/config
sudo chown "$(id -u)":"$(id -g)" "$HOME"/.kube/config
Install Calico as the Network Plugin:
kubectl apply -f https://raw.githubusercontent.com/projectcalico/calico/v3.26.0/manifests/calico.yaml
Retrieve the join command for worker nodes:
kubeadm token create --print-join-command
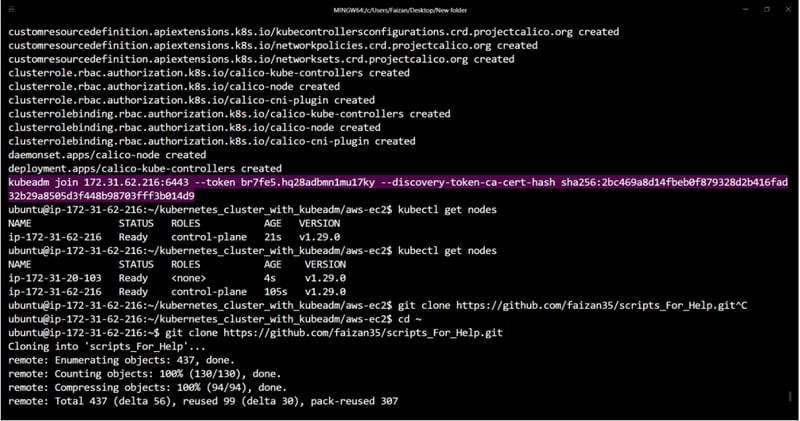
5️⃣ Join Worker Nodes
Run the join command obtained from the master node:
sudo kubeadm join :6443 --token --discovery-token-ca-cert-hash sha256:<hash> --v=5
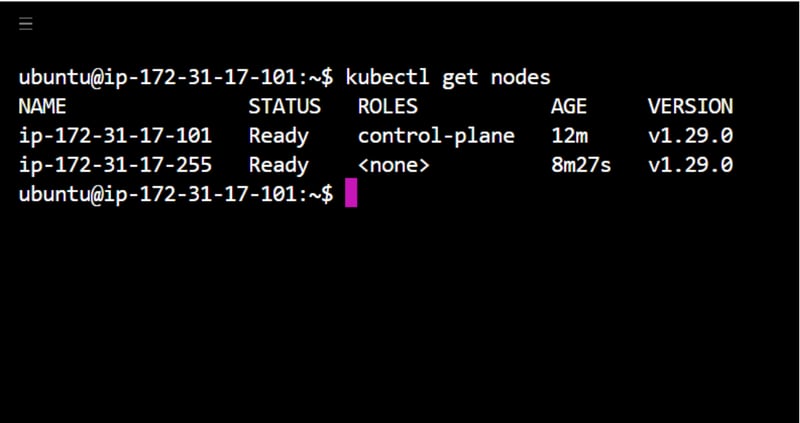
Verify the cluster status on the master node:
kubectl get nodes
Setting Up DevOps Tools
Jenkins Installation
sudo apt install openjdk-17-jre-headless -y
wget -O /usr/share/keyrings/jenkins-keyring.asc https://pkg.jenkins.io/debian-stable/jenkins.io-2023.key
echo "deb [signed-by=/usr/share/keyrings/jenkins-keyring.asc] https://pkg.jenkins.io/debian-stable binary/" | sudo tee /etc/apt/sources.list.d/jenkins.list
sudo apt-get update
sudo apt-get install jenkins -y
Docker Installation
sudo apt-get update
sudo apt-get install -y ca-certificates curl

sudo curl -fsSL https://download.docker.com/linux/ubuntu/gpg -o /etc/apt/keyrings/docker.asc
sudo chmod a+r /etc/apt/keyrings/docker.asc

echo "deb [arch=$(dpkg --print-architecture) signed-by=/etc/apt/keyrings/docker.asc] https://download.docker.com/linux/ubuntu $(. /etc/os-release && echo "$VERSION_CODENAME") stable" | sudo tee /etc/apt/sources.list.d/docker.list > /dev/null

sudo apt-get update
sudo apt-get install -y docker-ce docker-ce-cli containerd.io
Nexus Repository Setup
docker run -d --name nexus -p 8081:8081 sonatype/nexus3:latest
Retrieve the Nexus admin password:
docker exec -it cat /nexus-data/admin.password
Segment 2: Setting Up a Private Git Repository
Follow these steps to create a private Git repository, generate a personal access token, connect to the repository, and push your code securely.
1. Create a Private Git Repository
- Log in to your preferred Git hosting platform (e.g., GitHub, GitLab, Bitbucket).
- Navigate to the “Repositories” section.
- Click on “New Repository” and set its visibility to Private.
- Copy the repository URL for later use.
2. Generate a Personal Access Token (PAT)
- Go to your account Settings.
- Find the Developer Settings (GitHub) or Access Tokens section (GitLab, Bitbucket).
- Generate a new Personal Access Token (PAT) with the required permissions, such as:
- repo (for full repository access)
- read:packages (if accessing packages)
- Copy and save the token securely, as it will not be displayed again.
3. Clone the Repository Locally
- Open a terminal or Git Bash.
- Navigate to the directory where you want to store the repository.
- Run the following command, replacing
with your actual repository link:
git clone
- Navigate into the cloned repository folder:
cd
4. Add Your Code to the Repository
- Move or create your project files inside the repository directory.
5. Stage and Commit Changes
- Stage all files for the commit:
git add .
- Commit the staged changes with a meaningful message:
git commit -m "Initial commit: Added project files"
6. Push Changes to the Private Repository
- Push your changes to the remote repository:
git push
- If it’s your first time pushing, set the upstream branch and push:
git push -u origin main
(Replace main with master or any other branch name, if applicable.)
7. Authenticate Using a Personal Access Token
- When prompted for credentials:
- Username: Enter your GitHub/GitLab/Bitbucket username.
- Password: Use the Personal Access Token (PAT) instead of your password.
8. Verify the Push
- Go to your Git hosting platform and open the repository.
- You should see the committed files successfully uploaded.
Segment 3: CI/CD Setup in Jenkins
Installing Required Jenkins Plugins
Before setting up the CI/CD pipeline, install the following Jenkins plugins:
-
Eclipse Temurin Installer
- Enables Jenkins to install and configure the Eclipse Temurin JDK (formerly AdoptOpenJDK).
- Go to Jenkins Dashboard → Manage Jenkins → Manage Plugins → Available tab.
- Search for Eclipse Temurin Installer, select it, and click Install without restart.
-
Pipeline Maven Integration
- Adds Maven support to Jenkins Pipelines, allowing Maven commands within scripts.
- Install it by searching for Pipeline Maven Integration in the plugin manager.
-
Config File Provider
- Allows centralized storage of configuration files (properties, XML, JSON) in Jenkins.
- Install via the plugin manager.
-
SonarQube Scanner
- Integrates SonarQube for code quality and security analysis during builds.
- Search for SonarQube Scanner in the plugin manager and install it.
-
Kubernetes CLI
- Enables Jenkins to interact with Kubernetes clusters using
kubectl. - Install it from the plugin manager.
- Enables Jenkins to interact with Kubernetes clusters using
-
Kubernetes Plugin
- Allows Jenkins agents to run as Kubernetes pods for dynamic scaling.
- Install via the plugin manager.
-
Docker Plugin
- Enables Jenkins to interact with Docker for building and managing containers.
- Install it from the plugin manager.
-
Docker Pipeline Plugin
- Extends Jenkins Pipeline with steps to build, publish, and manage Docker containers.
- Install it via the plugin manager.
After installation, configure these plugins in Manage Jenkins → Global Tool Configuration and set up credentials where required.
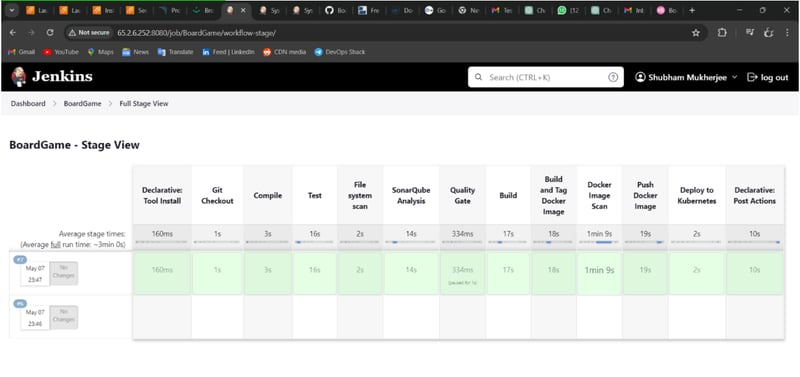
Creating a Jenkins CI/CD Pipeline
Once the plugins are installed, create a new Pipeline job in Jenkins and use the following script:
Jenkinsfile: CI/CD Pipeline for Java Application Deployment
pipeline {
environment {
SCANNER_HOME = tool 'sonar-scanner'
}
tools {
jdk 'jdk17'
maven 'maven3'
}
stages {
stage('Git Checkout') {
steps {
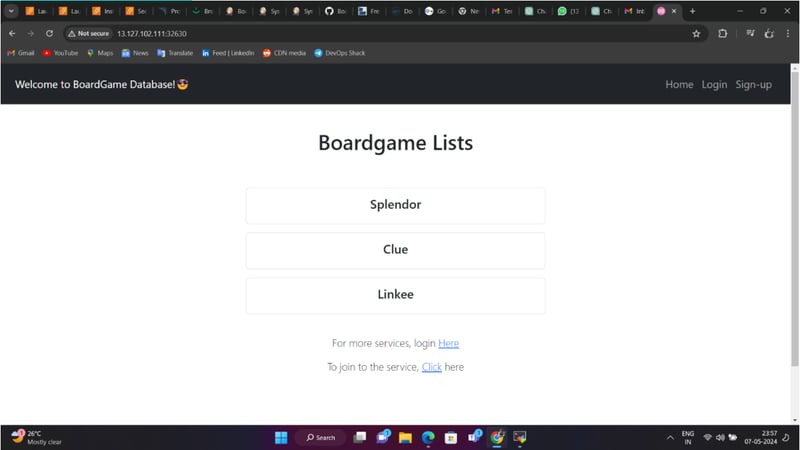
git branch: 'main', credentialsId: 'git-cred', url: 'https://github.com/jaiswaladi246/Boardgame.git'
}
}
stage('Compile') {
steps {
sh "mvn compile"
}
}
stage('Run Tests') {
steps {
sh "mvn test"
}
}
stage('Trivy File System Scan') {
steps {
sh "trivy fs --format table -o trivy-fs-report.html ."
}
}
stage('SonarQube Code Analysis') {
steps {
withSonarQubeEnv('sonar') {
sh '''
$SCANNER_HOME/bin/sonar-scanner -Dsonar.projectName=BoardGame -Dsonar.projectKey=BoardGame -Dsonar.java.binaries=.
'''
}
}
}
stage('Quality Gate Check') {
steps {
script {
waitForQualityGate abortPipeline: false, credentialsId: 'sonar-token'
}
}
}
stage('Build Artifact') {
steps {
sh "mvn package"
}
}
stage('Publish Artifacts to Nexus') {
steps {
withMaven(globalMavenSettingsConfig: 'global-settings', jdk: 'jdk17', maven: 'maven3', traceability: true) {
sh "mvn deploy"
}
}
}
stage('Build and Tag Docker Image') {
steps {
script {
withDockerRegistry(credentialsId: 'docker-cred', toolName: 'docker') {
sh "docker build -t jaiswaladi246/Boardgame:latest ."
}
}
}
}
stage('Docker Image Security Scan') {
steps {
script {
withDockerRegistry(credentialsId: 'docker-cred', toolName: 'docker') {
sh "trivy image --format table -o trivy-image-report.html jaiswaladi246/Boardgame:latest"
}
}
}
}
stage('Push Docker Image to Registry') {
steps {
script {
withDockerRegistry(credentialsId: 'docker-cred', toolName: 'docker') {
sh "docker push jaiswaladi246/Boardgame:latest"
}
}
}
}
stage('Deploy to Kubernetes') {
steps {
withKubeConfig(credentialsId: 'k8-cred', namespace: 'webapps', serverUrl: 'https://172.31.8.22:6443') {
sh "kubectl apply -f deployment-service.yaml"
sh "kubectl get pods -n webapps"
}
}
}
}
post {
always {
script {
def jobName = env.JOB_NAME
def buildNumber = env.BUILD_NUMBER
def pipelineStatus = currentBuild.result ?: 'UNKNOWN'
def body = """
${jobName} - Build ${buildNumber}
Pipeline Status: ${pipelineStatus.toUpperCase()}
Check the console output.
"""
emailext(
subject: "${jobName} - Build ${buildNumber} - ${pipelineStatus.toUpperCase()}",
body: body,
to: 'jaiswaladi246@gmail.com',
from: 'jenkins@example.com',
replyTo: 'jenkins@example.com',
mimeType: 'text/html',
attachmentsPattern: 'trivy-image-report.html'
)
}
}
}
}
Pipeline Breakdown
-
Git Checkout
- Clones the project from GitHub using credentials.
-
Build and Test
- Compiles the project and runs tests using Maven.
-
Security Scanning
- Scans the file system and Docker image for vulnerabilities using Trivy.
-
SonarQube Code Analysis
- Runs a SonarQube scan for code quality and security issues.
-
Quality Gate Check
- Ensures that the SonarQube quality gate is passed before proceeding.
-
Build and Publish Artifacts
- Packages the application and pushes it to Nexus.
-
Docker Image Build and Push
- Builds a Docker image and pushes it to a registry.
-
Deploy to Kubernetes
- Deploys the application to a Kubernetes cluster using
kubectl.
- Deploys the application to a Kubernetes cluster using
-
Notification
- Sends an email notification with pipeline status and the Trivy security report.
Segment 4: Monitoring Setup
Prometheus Installation and Setup
Download Prometheus and Exporters
- Download Prometheus, Node Exporter, and Blackbox Exporter from:
👉 Prometheus Downloads
Install and Run Prometheus
- Extract the downloaded
.tar.gzfile. - Navigate to the extracted directory and run:
./prometheus &
- By default, Prometheus runs on port 9090.
- Access it in a browser:
http://:9090
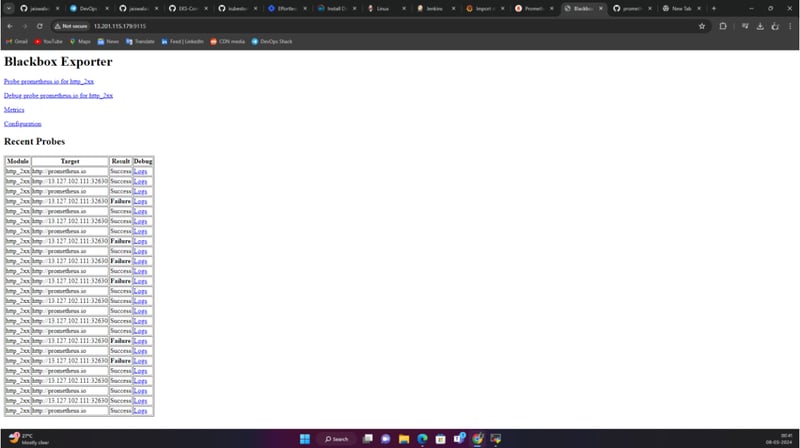
Install and Run Blackbox Exporter
- Extract the Blackbox Exporter
.tar.gzfile. - Navigate to the extracted directory and run:
./blackbox_exporter &
Grafana Installation and Setup
Download and Install Grafana
- Download Grafana from:
👉 Grafana Downloads
Alternatively, Install Grafana on Ubuntu
Run the following commands on your Monitoring VM:
sudo apt-get install -y adduser libfontconfig1 musl
wget https://dl.grafana.com/enterprise/release/grafana-enterprise_10.4.2_amd64.deb
sudo dpkg -i grafana-enterprise_10.4.2_amd64.deb
Start Grafana Service
sudo /bin/systemctl start grafana-server
- Grafana runs on port 3000 by default.
- Access it in a browser:
http://:3000
Configuring Prometheus
Modify Prometheus Configuration (prometheus.yaml)
Edit the file to include the Blackbox Exporter:
scrape_configs:
  - job_name: 'blackbox'
    metrics_path: /probe
    params:
      module: [http_2xx]  # Checks for HTTP 200 response
    static_configs:
      - targets:
        - http://prometheus.io  # HTTP Target
        - https://prometheus.io # HTTPS Target
        - http://example.com:8080  # HTTP on port 8080
    relabel_configs:
      - source_labels: [__address__]
        target_label: __param_target
      - source_labels: [__param_target]
        target_label: instance
      - target_label: __address__
        replacement: :9115
- Replace
with your server’s IP address.
Restart Prometheus
- Find the Prometheus process ID:
pgrep prometheus
- Kill the existing process and restart Prometheus.
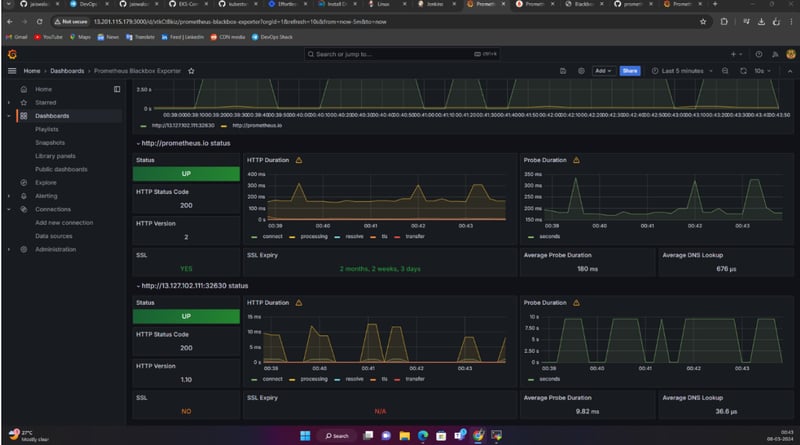
Adding Prometheus as a Data Source in Grafana
-
Login to Grafana (
http://:3000). - Navigate to Settings → Data Sources → Add Data Source.
- Select Prometheus as the source.
- Enter the Prometheus server URL (
http://:9090). - Save and test the connection.
- Import a Prometheus dashboard from Grafana’s public dashboard library.
🚀 Your monitoring setup with Prometheus and Grafana is now ready!
Results:
JENKINS PIPELINE:
PROMETHEUS:
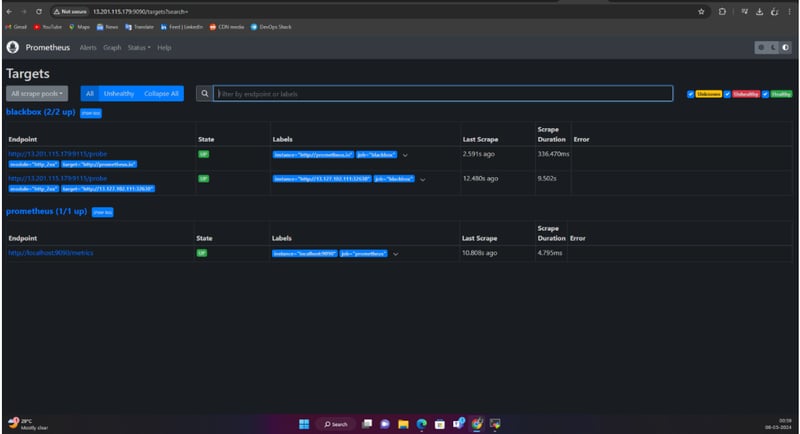
BLACKBOX:
GRAFANA:
APPLICATION:
Conclusion
The successful implementation of the DevOps CI/CD pipeline project marks a significant milestone in enhancing the efficiency, reliability, and quality of software delivery processes. By automating key aspects of the software development lifecycle, including compilation, testing, deployment, and monitoring, the project has enabled rapid and consistent delivery of software releases, contributing to improved time-to-market and customer satisfaction.
Acknowledgment of Contributions
I want to express my gratitude to DevOps Shack for their excellent project and implementation guide.
Final Thoughts
Looking ahead, the project’s impact extends beyond its immediate benefits, paving the way for continuous improvement and innovation in software development practices. By embracing DevOps principles and leveraging cutting-edge tools and technologies, we have laid a solid foundation for future projects to build upon. The scalability, flexibility, and resilience of the CI/CD pipeline ensure its adaptability to evolving requirements and technological advancements, positioning our organization for long-term success in a competitive market landscape.
References
-
Jenkins Documentation: https://www.jenkins.io/doc/
-
Maven Documentation: https://maven.apache.org/guides/index.html
-
SonarQube Documentation: https://docs.sonarqube.org/latest/
-
Trivy Documentation: https://github.com/aquasecurity/trivy
-
Nexus Repository Manager Documentation: https://help.sonatype.com/repomanager3
-
Docker Documentation: https://docs.docker.com/
-
Kubernetes Documentation: https://kubernetes.io/docs/
-
Prometheus Documentation: https://prometheus.io/docs/
-
Grafana Documentation: https://grafana.com/docs/
These resources provided valuable insights, guidance, and support throughout the project lifecycle, enabling us to achieve our goals effectively.
🛠️ Author & Community
This project is crafted by Harshhaa 💡.
I’d love to hear your feedback! Feel free to share your thoughts.
📧 Connect with me:
![]()
📢 Stay Connected