If you have a limited understanding of serverless, you might feel like you’re missing out on its full potential. A deeper grasp of the tools at your disposal could unlock a new level of productivity.
You might be building and hosting products across different cloud providers but still wondering how everything actually works behind the scenes.
Recently, there’s been a lot of discussion about serverless and you may have missed the opportunity to fully understand what it means. Let’s break down what qualifies a cloud-based feature as truly serverless and how it differs from being merely cloud based or cloud native.
What To Expect:
- We will build a meme generator using Nitric, which is the backend framework, and use OpenAI DALL-E models for image generation.
- Use Nitric to deploy our code to serverless platforms.
Bonus — We are also going to build the frontend of this application to interact with our backend API. Here is a sample demo of our final implementation:
What Do the Experts Say?
One of the best ways to understand this topic is to listen to industry experts. Let’s examine some of the best ideas already out there.
Here are some tweets and posts:
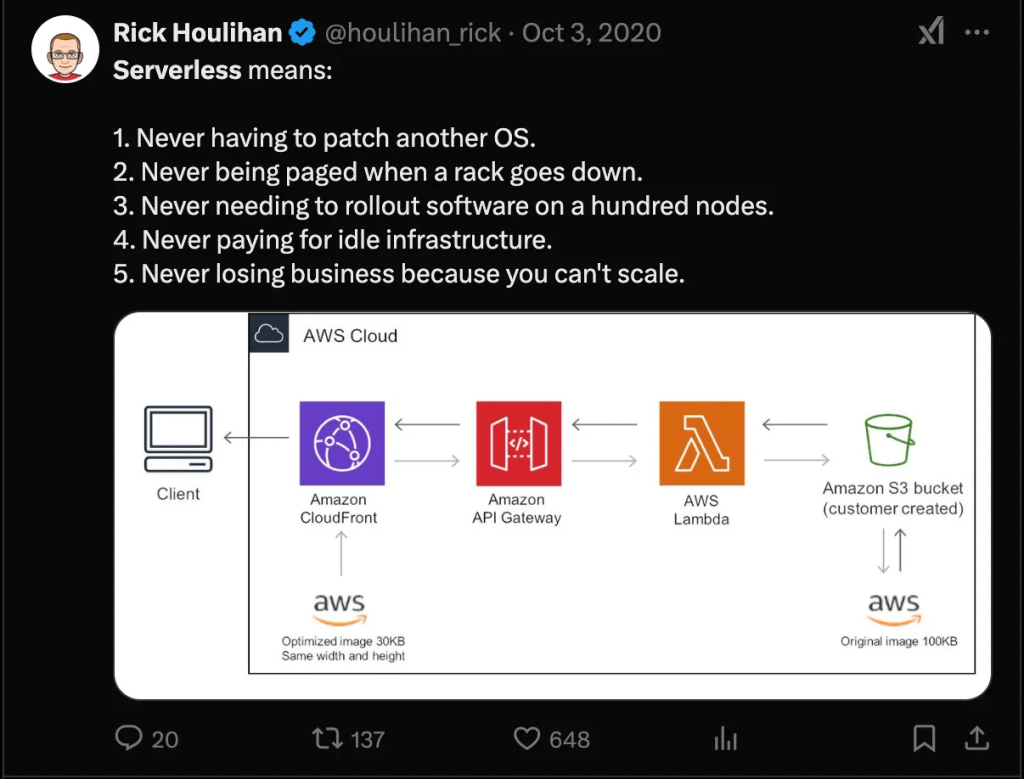
From the creator of DynamoDB, Rick Houlihan…
From Pulumi…
“Serverless refers to a cloud computing execution model where cloud providers manage the infrastructure automatically, abstracting away the complexity of server management from developers. In a serverless architecture, developers focus solely on writing code for individual functions or services without concerning themselves with server provisioning, scaling or maintenance.”
In summary, the goal of serverless is to allow developers to focus on the application code and business logic. You never have to worry about managing the underlying servers. The cloud provider will handle the provisioning of servers, auto-scaling or monitoring behind the scenes.
Why Use Nitric?
Here’s why we are using Nitric to make things easier:
- Nitric helps us build our code in a simpler way, by handling the complex cloud configuration for us.
- Nitric translates the code to what cloud platforms like AWS/Google Cloud Platform (GCP)/Microsoft Azure expect.
- The cloud providers do the actual server management.
Prerequisites
Make sure you have the following tools, accounts and configurations set up in your development environment.
Development Environment
Required Software
- Node.js (v18.0.0 or higher)
- npm (v9.0.0 or higher) or Yarn (v1.22.0 or higher) or pnpm (v.9.12.3 or higher)
- Git (v2.30.0 or higher)
- Visual Studio Code (recommended) or your preferred IDE
- Docker Desktop (required for local development with Nitric)
Command Line Tools
- Install AWS CLI
# For Macos
brew install awscli

#For Linux
curl "" -o "awscliv2.zip"
unzip awscliv2.zip
sudo ./aws/install
- Nitric CLI (latest version)
Nitric relies on functionality from git andDocker to help retrieve plugins, containerize and deploy your application. Please follow the links to the official implementations of each.
#On Macos
brew install nitrictech/tap/nitric
#On Linux
curl -L "" | bash
#On Windows
scoop bucket add nitric
scoop install nitric
Once this is installed, we can upgrade it to the latest version.
#On Macos
brew upgrade nitric
#On Linux
curl -L "" | bash
#On Windows
scoop update nitric
Deployment plugins have their own requirements, and we will have a look at them toward the end of this guide while deploying our application.
Required Accounts
We will use AWS as our cloud provider.
- AWS account
- Create a free account at aws.amazon.com.
- Set up an identity and access management (IAM) user with programmatic access using this guide.
- You can attach the “AmazonAPIGatewayAdministrator and AWSLambdaFullAccess” for programmatic access, then retrieve the secret key and access key and keep it in a safe place so you can easily access later.
- This is the final screen when setting up the programmatic access. Make sure to download the CSV file or copy the access key or secret key.
- OpenAI Account
- Sign up at platform.openai.com.
- Generate an API key and save it somewhere safe where you can access it in the next step.
- Ensure you have credits or a paid subscription
Getting Started
We will start by cloning a starter repo that contains our frontend basic components setup.
git clone --branch starter --single-branch
Next, open the project in your editor of choice.
cd nitric-meme-generator
Inside this directory, we will create our Nitric backend and make sure you have a new directory with a src directory inside and a package.json.
nitric new backend ts-starter
Navigate to the new project directory and install the dependencies:
cd backend
npm install
npm install openai util dotenv
Your project should have this structure:

Working on Our Backend
We will need to start working on our application logic in the backend/services/api.ts file.
Delete all the existing code and import the necessary modules required for our project and install some of them inside this directory if you did not in our initial setup.
In the code below:
- The Nitric SDK is used to create an API with Nitric.
- We are also using OpenAI’s official library for interacting with its API;
zlibandpromisifyare used to compress the data we get from OpenAI, which is in base64 encoded format. - The
dotenv/configautomatically loads variables from a.envfile.
import { api } from "@nitric/sdk";
import OpenAI from "openai";
import zlib from "zlib";
import { promisify } from "util";
import "dotenv/config";
Define Constants
- In this code we use
promisifyto convertzlib.gziinto a promise-based function to run asynchronously. TIMEOUT_MILLIS: We use this to set the timeout of OpenAI calls to 55 seconds.DEFAULT_IMAGE_SIZE: This will be the default image resolutions for generated images.
const gzip = promisify(zlib.gzip);
const TIMEOUT_MILLIS = 55 * 1000;
const DEFAULT_IMAGE_SIZE = "1024x1024";
Configure CORS Headers
const CORS_HEADERS = {
  "Access-Control-Allow-Origin": ["*"],
  "Access-Control-Allow-Methods": ["POST", "OPTIONS"],
  "Access-Control-Allow-Headers": ["Content-Type", "Accept-Encoding"],
  "Access-Control-Max-Age": ["86400"],
};
In the following headers, we have allowed cross-origin requests, enabling any domain/website to use our API. But you can change this in production environments for safety.
And we have also ensured that only POST requests are sent to this endpoint.
Initialize OpenAI Client
In this step, we will now create a .env file and add our OPENAI_API_KEY="your_api_key_from_open_ai" . This env file should be located at the root of our backend folder.
Then include the following code to initialize OpenAI’s APIclient using the already defined environment variables.
const openai = new OpenAI({
  apiKey: process.env.OPENAI_API_KEY,
});
Define Typescript Types
- The
ProviderKeytype ensuresopenaiis the only provider we are using, but you could add more if you want to have more options in this project. Other available providers arereplicate,Nebius,fireworksand many more. - The
OpenAIModelIdwill limit our model selection to the only available models on OpenAI, which aredall-e-2anddall-e-3. - The
GenerateImageRequestwill guide the shape of our request body to OpenAI or any other provider we pick.
export type ProviderKey = "openai";
export type OpenAIModelId = "dall-e-2" | "dall-e-3";

interface GenerateImageRequest {
  prompt: string;
  provider: ProviderKey;
  modelId: OpenAIModelId;
}
Create a Timeout Wrapper
Next we create a timeout function that will ensure our requests timeout after 55 seconds if they take too long to respond.
const withTimeout = (
  promise: Promise,
  timeoutMillis: number
): Promise => {
  return Promise.race([
    promise,
    new Promise((_, reject) =>
      setTimeout(
        () => reject(new Error(`Request timed out after ${timeoutMillis}ms`)),
        timeoutMillis
      )
    ),
  ]);
};
Validate our Request
In this code, we use this to validate that our request is a valid OpenAI model. The provider must also be OpenAI, and it will not accept an empty prompt, so we can prevent making API calls that will be guaranteed to fail.
const validateRequest = (
  requestBody: GenerateImageRequest,
  requestId: string
): { isValid: boolean; error?: string } => {
  if (!requestBody.prompt?.trim()) {
    console.error(`[${requestId}] Missing or empty prompt`);
    return { isValid: false, error: "Prompt is required" };
  }

  if (requestBody.provider !== "openai") {
    console.error(`[${requestId}] Invalid provider: ${requestBody.provider}`);
    return { isValid: false, error: "Only OpenAI provider is supported" };
  }

  if (!["dall-e-2", "dall-e-3"].includes(requestBody.modelId)) {
    console.error(`[${requestId}] Invalid model ID: ${requestBody.modelId}`);
    return { isValid: false, error: "Invalid model ID" };
  }

  return { isValid: true };
};
Create the API Endpoint and Handle CORS
const imageApi = api("image-api");

imageApi.options("/generate-image", async (ctx) => {
  ctx.res.headers = CORS_HEADERS;
  ctx.res.status = 204;
  return ctx;
});
Putting It All Together So We Can Make Our API Call
- This is now our logic that will handle the image generation requests. It will also ready and validate our request body; if it fails, it returns a 500 Server error.
imageApi.post("/generate-image", async (ctx) => {
  ctx.res.headers = {
    ...CORS_HEADERS,
    "Content-Encoding": ["gzip"],
    "Content-Type": ["application/json"],
  };

  const requestId = Math.random().toString(36).substring(7);
  console.log(`[${requestId}] Starting image generation request`);

  let requestBody: GenerateImageRequest;
  try {
    requestBody = ctx.req.json() as GenerateImageRequest;
    console.log(`[${requestId}] Request body:`, {
      prompt: requestBody.prompt?.substring(0, 50) + "...",
      provider: requestBody.provider,
      modelId: requestBody.modelId,
    });
  } catch (error) {
    console.error(`[${requestId}] Failed to parse request body:`, error);
    ctx.res.status = 400;
    ctx.res.body = await gzip(
      JSON.stringify({ error: "Invalid JSON in request body" })
    );
    return ctx;
  }

  const validation = validateRequest(requestBody, requestId);
  if (!validation.isValid) {
    ctx.res.status = 400;
    ctx.res.body = await gzip(JSON.stringify({ error: validation.error }));
    return ctx;
  }

  if (!process.env.OPENAI_API_KEY) {
    console.error(`[${requestId}] OPENAI_API_KEY is not set`);
    ctx.res.status = 500;
    ctx.res.body = await gzip(
      JSON.stringify({ error: "OpenAI API key not configured" })
    );
    return ctx;
  }

  const startstamp = performance.now();
  console.log(`[${requestId}] Sending request to OpenAI API`);

  try {
    const imageResponse = await withTimeout(
      openai.images.generate({
        model: requestBody.modelId,
        prompt: requestBody.prompt,
        size: DEFAULT_IMAGE_SIZE,
        response_format: "b64_json",
        n: 1,
      }),
      TIMEOUT_MILLIS
    );

    const elapsed = ((performance.now() - startstamp) / 1000).toFixed(1);

    if (!imageResponse.data?.[0]?.b64_json) {
      throw new Error("Response missing image data");
    }

    console.log(`[${requestId}] Request completed successfully`);
    ctx.res.status = 200;

    const responseData = {
      provider: requestBody.provider,
      image: imageResponse.data[0].b64_json,
      elapsed: `${elapsed}s`,
    };

    ctx.res.body = await gzip(JSON.stringify(responseData));
    return ctx;
  } catch (error) {
    console.error(`[${requestId}] Error generating image:`, error);
    ctx.res.status = 500;
    ctx.res.body = await gzip(
      JSON.stringify({ error: `Error generating image: ${error.message}` })
    );
    return ctx;
  }
});

export default imageApi;
This API validates user input, sends requests to OpenAI and compresses responses to improve performance. It is also secure, efficient and scalable.
Start Our Project and Make the First Request
Next, we need to test our endpoint.
Run the project using:
%nitric start
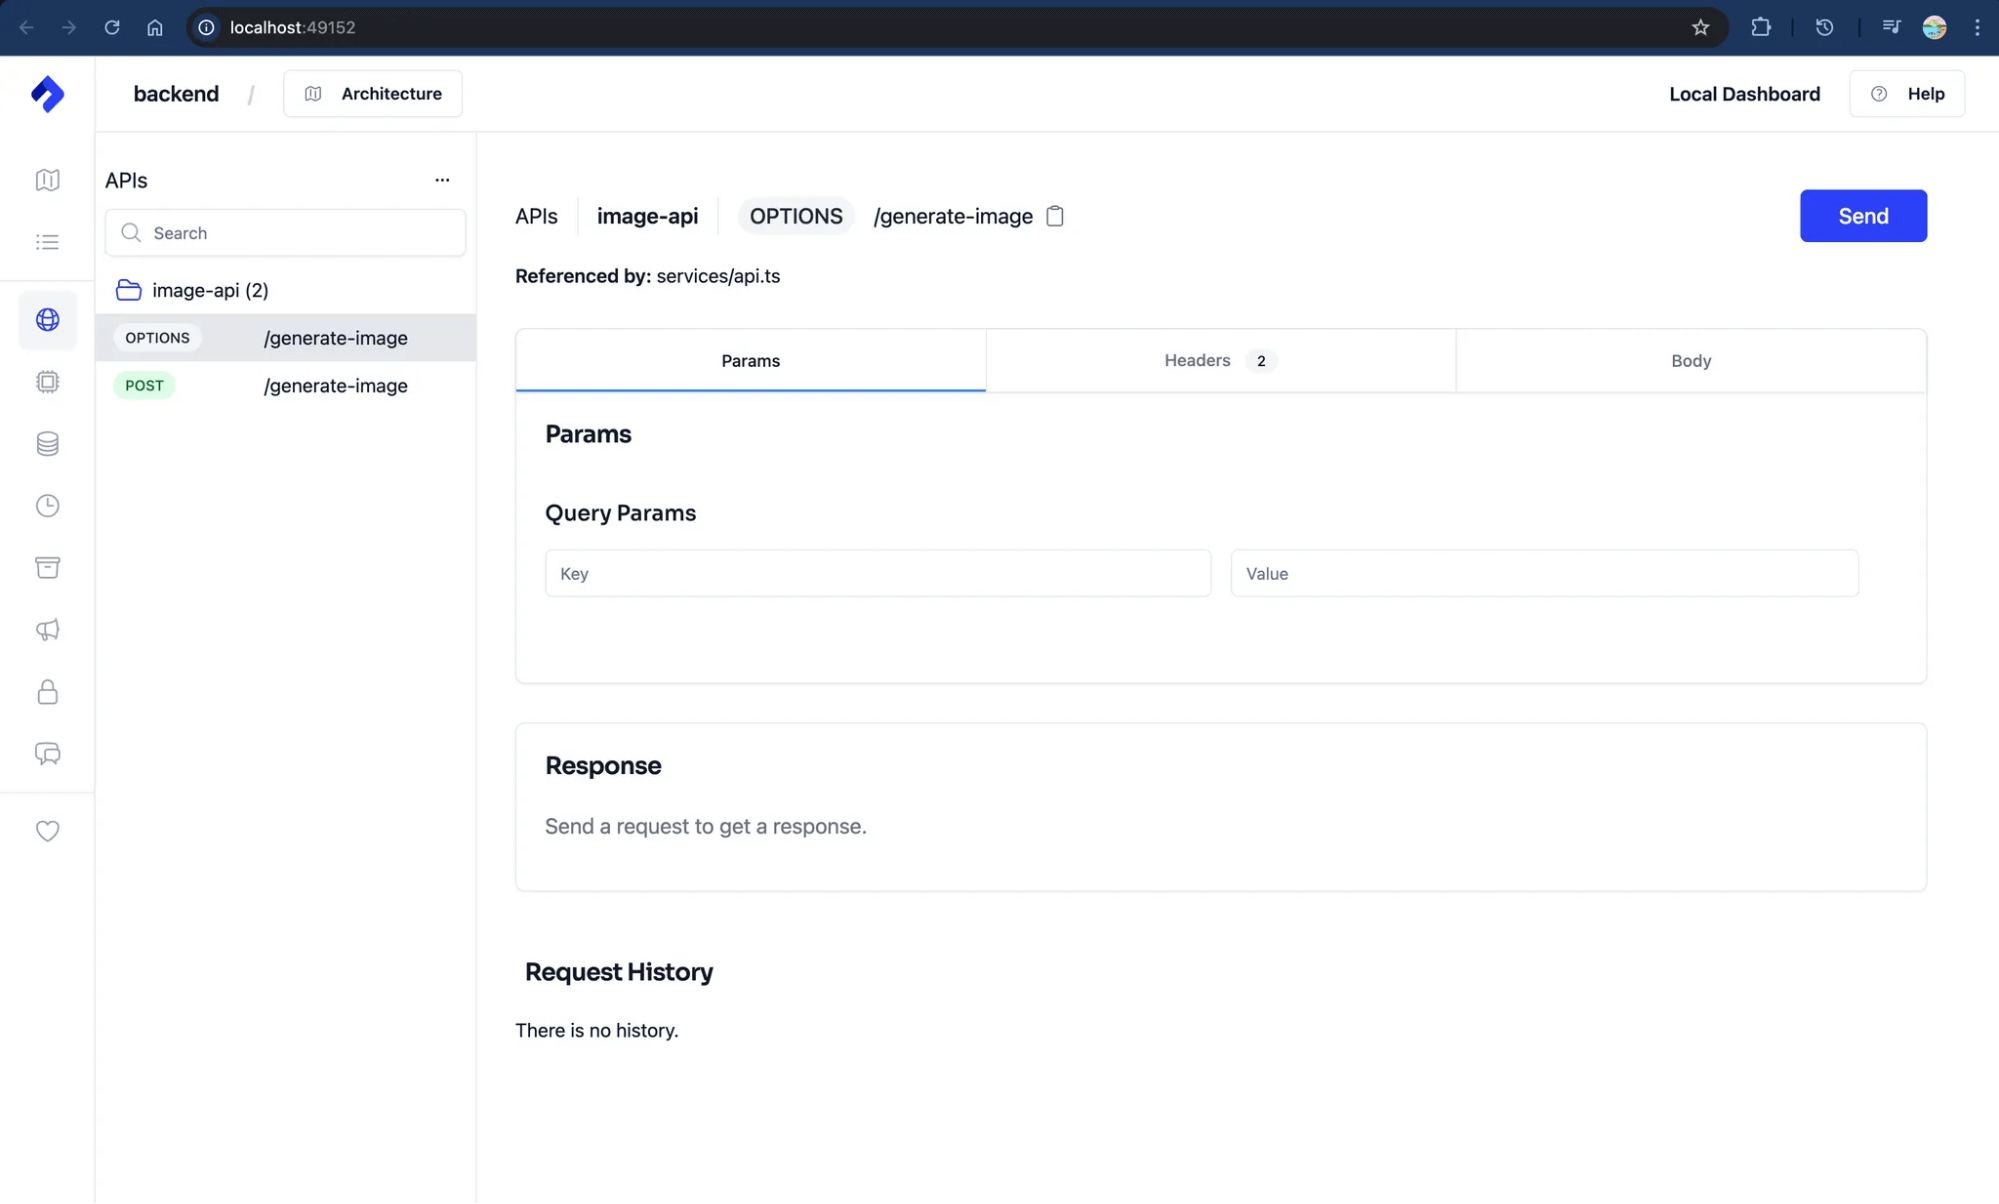
You should be redirected to the Nitric dashboard, where you can make your requests, check your logs, etc.
Or you can make your request using curl like this and get your response:
curl -X POST
     -H "Content-Type: application/json"
     -H "Accept-Encoding: gzip"
     -d '{
       "prompt": "A futuristic cityscape at night",
       "provider": "openai",
       "modelId": "dall-e-3"
     }'
Deploying the Backend App
Now that we have implemented our OpenAI integration and tested that it works, you can deploy it to one or more cloud platforms. We will be using the Nitric Provider Plugins to deploy the app without changing code in our app.
At the beginning you configured access for AWS and kept the secret keys somewhere safe. Now we need to create a new stack file that will represent our deployment target.
First we need to configure AWS CLI by running the following command:
aws configure
You will be prompted to enter, access key, secret key and default region name us-east-1.
Then come back to our project and configure our stack by running the following command:
nitric stack new
This will create a new file called nitric.dev.yaml. Edit this file and set any remaining configurations.
provider: nitric/aws@1.17.0
region: us-east-1
You can now build and deploy your project using:
nitric up
Typically, when the deployment is complete, the base URL of your service will be displayed in the CLI output.
Bonus Work
This section is optional. You can decide to use your own custom frontend, but we prepared a sample you can use. This is the UI of our frontend, and you can play around with it here:
To use this frontend for your application, navigate back into the root project and create an environment variable and add the base URL of the application you deployed or if you are running it locally, you can add the following link:
cd ..
touch .env
NEXT_PUBLIC_API_BASE_URL="app-url.com"
#local
NEXT_PUBLIC_API_BASE_URL=""
Then once you have added the file, you can go ahead and install dependencies and run your project and test.
npm install
npm run dev
You can access the local server to your frontend application at http://localhost:3000/, which will be displayed on your terminal after running the command above.
The frontend code is ready to be deployed to Vercel. We just added a vercel.ignore in the starter that excluded the backend from being included in the final build folder dist.
And the Point Was?
After building this project, you have learned that serverless is not right or left. Instead, it’s a setup that makes a service easier to use. By eliminating the undifferentiated heavy lifting, developers can focus more on building out their applications.
The project can now be deployed to more cloud platforms with very little effort. Cheers 🔥.
The final code is here: https://github.com/nitrictech/examples/tree/main/v1/nitric-meme-generator.
The post Building a Serverless Meme Generator With Nitric and OpenAI appeared first on The New Stack.